In this post we write making of the SEED GROWTH (Inside the Seed) Science Project Model for Exhibition DIY at home easily
Creating a model to illustrate the seed growth process inside the seed using cardboard and color paper can be a fun and educational activity.

Let’s build a simple 3D model to represent the stages of seed growth.
Materials needed:
- Cardboard (for the base and structures)
- Color paper (for representing different elements)
- Scissors
- Glue or double-sided tape
- Marker pens or sketch pens
Step-by-step instructions:
- Base:
- Cut a rectangular or square piece of cardboard to serve as the base for the model.
- Seed:
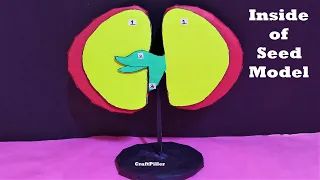
- Use color paper to represent the seed.
- Cut out a small oval or circle shape from color paper and label it as the seed.
- Seed Coat:
- Use another color paper to represent the seed coat.
- Cut out a slightly larger oval or circle shape and glue it around the seed to represent the seed coat.
- Embryo:
- Use color paper to represent the embryo inside the seed.
- Cut out a tiny heart or bean-shaped piece and label it as the embryo.
- Glue the embryo inside the seed coat.
- Cotyledons:
- Use color paper to represent the cotyledons, which are the first leaves of the embryo.
- Cut out two small leaf-shaped pieces and label them as cotyledons.
- Glue the cotyledons to the embryo inside the seed coat.
- Labeling and Details:
- Use marker pens or sketch pens to label each part of the model, such as the seed, seed coat, embryo, and cotyledons.
- You can also label the stages of seed growth (e.g., “Stage 1: Seed,” “Stage 2: Germination,” “Stage 3: Seedling”).
- Decorating the Model:
- Use markers or color paper to decorate the model and add more details to make it visually appealing.
- Optional: Add Soil Layer (Germination Stage):
- If you want to show the germination stage, you can add a layer of brown color paper on top of the cardboard to represent the soil.
- Cut out a small slit in the soil layer to place the seed in the germination stage, showing the seed sprouting with the cotyledons emerging.
Now, you have a simple 3D model that represents the seed growth process inside the seed using cardboard and color paper. This model can be a helpful visual aid to understand the stages of seed growth, from the seed to the germination stage with the emergence of cotyledons. It’s an interactive and creative way to explore the early development of a plant from a seed.
#seedgrowthmodel #insidetheseemodel #howtofunda #craftpiller #scienceproject #scienceexhibition #sciencemodel #seed #biologymodel #biologymodel #botanymodel