A hydraulic switch with safety pins and syringes is a simple yet effective model that demonstrates the principles of hydraulics and its application in controlling the flow of electricity. This interactive project allows for a hands-on understanding of how hydraulic systems can be utilized to operate electronic devices, such as switches.

Here’s an introduction to the key components and principles involved:
1. Hydraulic Switch:
- A hydraulic switch is a mechanism that controls the flow of fluids (usually liquids) to activate or deactivate a system. In this model, the hydraulic switch is created using syringes and safety pins.
2. Components:
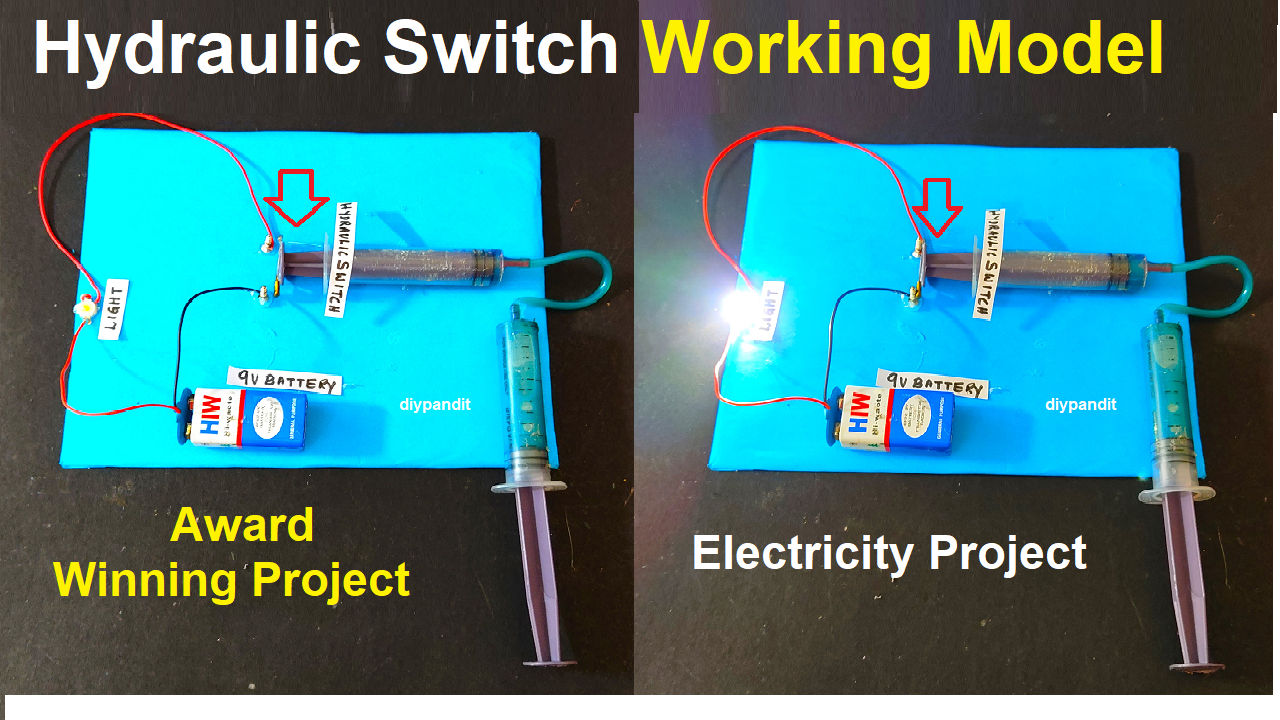
- Syringes: These act as cylinders in the hydraulic system, containing and directing the flow of water.
- Safety Pins: Attached to the plungers of the syringes, safety pins act as the actual switches in the circuit.
- Plastic Tubing: Connects the syringes, allowing the flow of water from one syringe to another.
- LED Bulb: Electronic components that represent devices controlled by the hydraulic switch.
- Battery: Provides the power source for the circuit.
3. Working Principle:
- When pressure is applied to one syringe by pushing the plunger, the water inside is forced through the tubing to the other syringe.
- As a result, the plunger of the second syringe is pushed out, causing a safety pin attached to it to complete an electrical circuit.
- This completion of the circuit activates an electronic device, such as a LED bulb.
electricity project working model making using a hydraulic switch with safety pins and syringe
Creating an electricity project working model using a hydraulic switch with safety pins and syringes can be an interesting and educational DIY activity.
Please note that safety precautions should be taken, and adult supervision may be required, especially when dealing with electricity.
Here’s a basic guide to help you create this model:
Materials:
- Small DC motor
- 9V battery
- Wire
- LED bulb
- Small piece of cardboard
- Plastic syringes (two)
- Safety pins
- Plastic tubing
- Small plastic container
- Water
- Insulating materials (e.g., electrical tape)
- Hot glue gun or strong adhesive
Step by Step Procedure To Make electricity project working model using hydraulic switch using safety pin and syringes:
- Hydraulic Switch Setup:
- Take two plastic syringes and connect them with plastic tubing. Make sure the tubing is tightly secured to avoid any water leakage.
- Attach a safety pin to the plunger of each syringe.
- Prepare the Base:
- Cut a small piece of cardboard to serve as the base for your project.
- Attach Components to the Base:
- Secure the LED bulb to the cardboard using hot glue or adhesive. Position them so that the motor can turn the safety pins on and off.
- Connect Wires:
- Connect wires to the LED bulb. Make sure to leave enough length for flexibility.
- Connect Hydraulic Switch:
- Connect one safety pin to the positive terminal one wire of the LED bulb. Use additional wires to connect the negative terminal wire of the LED bulb to the negative terminal of the battery.
- Secure the Hydraulic Switch:
- Position the hydraulic switch (syringes and safety pins) so that when you push one of the syringes, the safety pin makes contact, completing the circuit.
- Fill Syringes with Water:
- Fill one syringe with water, making sure there are no air bubbles. Connect the tubing and fill the second syringe with water as well.
- Test the Hydraulic Switch:
- Push one of the syringes to see if the safety pins make contact, completing the circuit and turning on the LED bulb.