A circle is a fundamental geometric shape defined by a set of points in a plane that are equidistant from a fixed center point.
Understanding the various parts of a circle is essential in geometry.
Here’s an introduction to the key components of a circle:
- Center:
- The center of a circle is the point equidistant from all points on the circle’s circumference. It is often represented by the letter “O.”
- Radius:
- The radius is the straight line segment that connects the center of the circle to any point on its circumference. All radii of the same circle are equal in length.
- Diameter:
- The diameter is the longest chord or straight line that passes through the center of the circle, connecting two points on the circumference. It is twice the length of the radius.
- Chord:
- A chord is any straight line segment that connects two points on the circle. If a chord passes through the center, it is a diameter.
- Secant:
- A secant is a line that intersects the circle at two distinct points. A diameter is a specific type of secant that passes through the center.
- Circumference:
- The circumference is the total length of the boundary or perimeter of the circle. It is calculated using the formula C = 2πr, where “r” is the radius.
- Arc:
- An arc is a curved section of the circle’s circumference. It is defined by two points on the circle, and its length is a fraction of the circumference.
- Sector:
- A sector is the region enclosed by an arc and the two radii extending from the center to the arc’s endpoints. The area of a sector is a fraction of the total area of the circle.
- Tangent:
- A tangent is a line that touches the circle at a single point without intersecting it. The radius at the point of tangency is perpendicular to the tangent.
- Interior and Exterior:
- The interior of a circle is the region inside its circumference, while the exterior is the region outside the circumference.
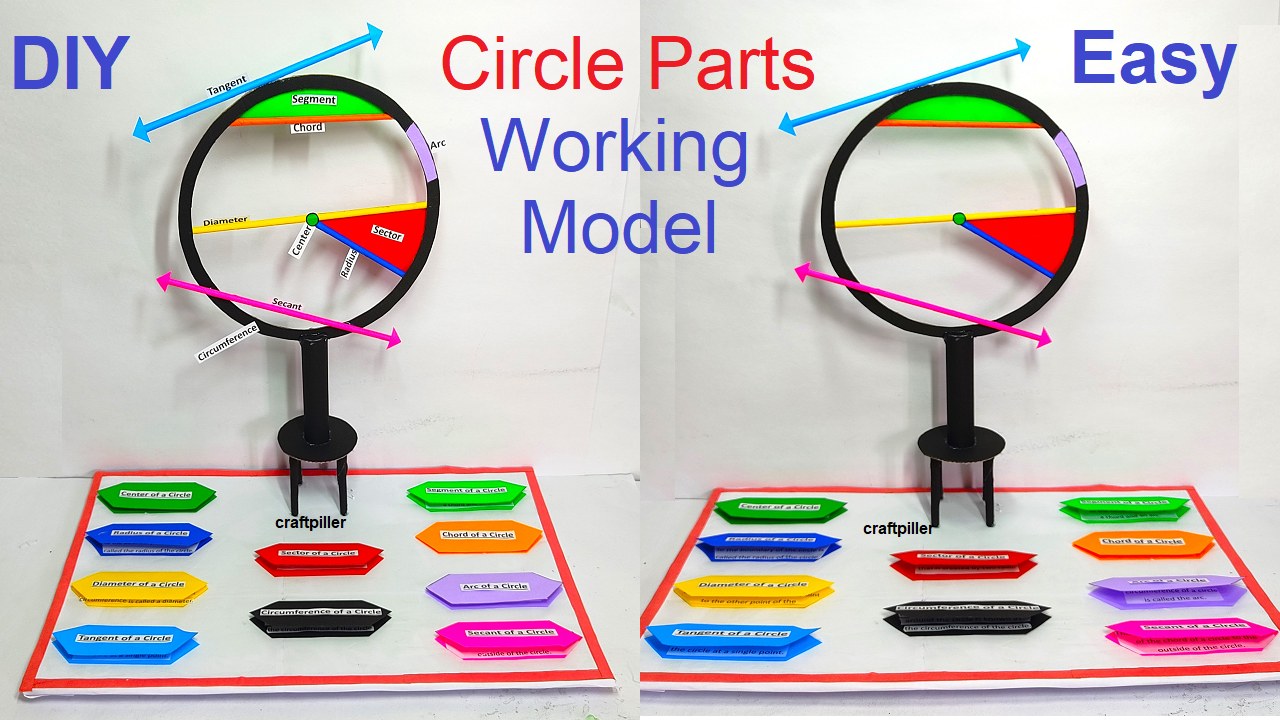
Creating a working model of the parts of a circle using cardboard
Creating a working model of the parts of a circle using cardboard can be a fun and educational DIY project.

Here’s a step-by-step guide to help you build a simple and effective model:
Materials:
- Large piece of cardboard
- Compass
- Ruler
- Pencil
- Scissors or craft knife
- Protractor
- String
- Push pin or thumbtack
- Marker or paint (optional)
- Glue or tape
Creating a working model of the parts of a circle using cardboard Instructions:
- Prepare the Base:
- Cut a large circle out of the cardboard to represent the overall shape of the circle.
- Center Point:
- Mark the center of the circle. This point represents the center of the circle.
- Radius:
- Using a ruler and compass, draw a radius from the center to any point on the circle. Label it as “Radius.”
- Diameter:
- Draw a diameter by extending the radius to the opposite side of the circle. Label it as “Diameter.”
- Chord and Secant:
- Draw a chord by connecting two points on the circle that are not on the diameter. Also, draw a secant that intersects the circle at two distinct points.
- Circumference:
- Measure the circumference of the circle using a string. Cut the string to match the circumference, and then use the string to trace the circumference on the cardboard. Label it as “Circumference.”
- Arc and Sector:
- Draw an arc by connecting two points on the circle, and label it as “Arc.” To create a sector, draw two radii extending from the center to the endpoints of the arc.
- Tangent:
- Draw a tangent line that touches the circle at a single point without intersecting it.
- Interior and Exterior:
- Shade the interior of the circle to represent the region inside the circumference. Leave the exterior unshaded.
- Decorate (Optional):
- Use markers or paint to enhance the visual appeal of your model. You can color different parts for better distinction.
- Labeling:
- Label each part of the circle with its respective term (center, radius, diameter, chord, etc.).
- Presentation:
- During a presentation or demonstration, explain each part of the circle and how they relate to one another. Discuss the formulas for circumference, area, and other relevant properties.