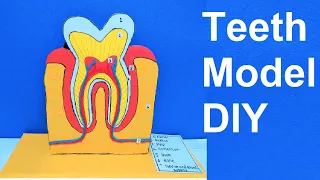
In this post we write about making of the tooth structure model project using cardboard
Creating a tooth structure model using cardboard, colored paper, and woolen thread is an excellent way to understand the different components of a tooth.

Here’s a step-by-step guide to making a simple tooth model:
Materials you’ll need:
- Cardboard (thick and rigid)
- Colored paper (white for the enamel, pink for the gum, and yellow for the dentin)
- Woolen thread (for the root canal and nerve)
- Scissors
- Glue or adhesive tape
- Markers or colored pens (optional, for additional details)
Step-by-step process:
- Prepare the base:
- Cut out a rectangular or square piece of cardboard to serve as the base for your tooth model. The size can vary depending on how detailed you want the model to be.
- Create the tooth shape:
- Use white colored paper to cut out a tooth-shaped structure. You can draw a simple tooth outline and then carefully cut it out using scissors.
- Form the enamel and dentin:
- Use the white colored paper to cut out another tooth shape slightly smaller than the first one. This will represent the enamel, the outermost protective layer of the tooth.
- Use yellow colored paper to cut out another tooth shape slightly smaller than the enamel layer. This will represent the dentin, the layer underneath the enamel.
- Position the layers:
- Glue or tape the enamel-colored paper on top of the tooth-shaped structure to represent the enamel layer.
- Glue or tape the dentin-colored paper on top of the enamel layer to represent the dentin.
- Add the gum:
- Use pink colored paper to cut out a rectangular strip to represent the gum. Glue or tape this strip to the bottom of the tooth-shaped structure to mimic the gumline.
- Create the root canal and nerve:
- Use the woolen thread to create a small canal-like structure at the bottom of the tooth model to represent the root canal.
- Add thinner woolen threads extending from the root canal to simulate the nerve endings.
- Use markers or colored pens to add additional details and labels to the tooth model. For example, you can label the enamel, dentin, root canal, and nerve.
This basic tooth structure model can help you visualize the different layers of a tooth and their arrangement. This simple model is a great educational tool to learn about the basic anatomy of a tooth.
#toothstructuremodel #scienceproject #craftpiller