In this post of writing about making of the seed germination science project diy at home sunflower life cycle model
Seed germination is a complex process involving water absorption, enzyme activation, respiration, and the growth of the embryo into a seedling.
The principles of seed germination highlight the importance of environmental conditions such as moisture, oxygen, temperature, and light in breaking seed dormancy and initiating growth.
Understanding these principles helps in cultivating plants effectively, ensuring healthy growth and development from seeds.

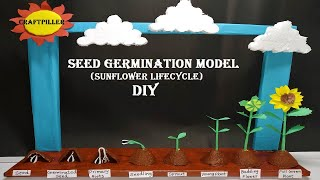
Creating a seed germination model using colored paper and cardboard is a fantastic way to visually demonstrate the stages of a seed’s growth.
This model will show the process from seed to sprout. Here’s a step-by-step guide to making a simple seed germination model:
Materials you’ll need:
- Cardboard or styrofoam (for the base)
- Colored paper (green for the sprout, brown for the seed)
- Scissors
- Glue or adhesive tape
- Markers or colored pens (optional, for additional details)
Step-by-step Video process:
- Prepare the base:
- Cut out a rectangular or square piece of cardboard or styrofoam to serve as the base for your seed germination model. The size can vary depending on how detailed you want the model to be.
- Create the seed:
- Use brown colored paper to cut out a small seed shape. It can be a simple oval or round shape to represent a seed. Glue or tape the seed shape onto one end of the base.
- Form the sprout:
- Use green colored paper to cut out a small sprout shape. This can be a simple stem with a few leaves emerging from the seed. Glue or tape the sprout shape next to the seed on the base.
- Add details:
- If you want to add more details, you can use markers or colored pens to draw roots coming out of the seed and branching out beneath the surface of the base.
- You can create small labels using colored paper or index cards to identify each stage of the seed germination process. Glue or tape these labels near the respective seed and sprout shapes.
- This simple model can effectively demonstrate the process of seed germination and help learners understand the growth stages of plants.
#seedgerminationmodel #sunflowerlifecycle #craftpiller