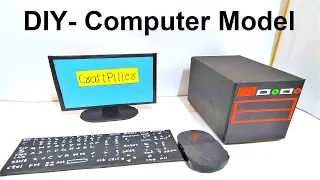
Creating a Simple Computer Model with Monitor, CPU, Keyboard, and Mouse using Cardboard and Colored Paper

In this project, we will create a basic computer model using cardboard and colored paper to represent a monitor, CPU (Central Processing Unit), keyboard, and mouse.
This is a fun and educational activity that can help you understand the basic components of a computer. Here are the steps:
Materials Needed:
- Cardboard sheets
- Colored paper or construction paper
- Scissors
- Glue or adhesive tape
- Markers or pens
Building the Computer Model:
1. Monitor:
Step 1: Cut out a rectangular piece of cardboard to serve as the base of your monitor.
Step 2: Create the monitor screen by cutting a smaller rectangular piece of colored paper. Glue or tape this paper to the front of the cardboard base to represent the monitor display.
Step 3: Add details to the monitor, such as buttons, power indicator lights, or a logo, using colored paper or markers.
2. CPU (Central Processing Unit):
Step 4: Cut out another rectangular piece of cardboard to represent the CPU unit. This should be smaller than the monitor.
Step 5: Use colored paper to add details to the CPU, such as vents, ports, and buttons. You can get creative and design your CPU’s appearance.
3. Keyboard:
Step 6: Create a keyboard shape on a piece of cardboard. Cut out individual keys from colored paper, and attach them to the keyboard base. You can label the keys with letters, numbers, and symbols.
Step 7: Design a small rectangular stand for the keyboard to rest on, so it’s at a comfortable typing angle.
4. Mouse:
Step 8: Design a mouse shape on cardboard and cut it out. Add details using colored paper, including buttons and a scroll wheel.
5. Assembling the Computer:
Step 9: Position the monitor, CPU unit, keyboard, and mouse on the base. Secure them with glue or adhesive tape. Arrange them in a way that resembles a real computer setup.
6. Adding Additional Details:
Step 10: Use markers or pens to add any extra details or labels to your computer model, such as labels for the keyboard keys or the CPU’s ports.
Your simple computer model is now complete!
This project provides a hands-on way to learn about the basic components of a computer and can be a fun addition to a school project or a learning activity at home.