INTRODUCTION
In this topic, we are going to show you how to build a Magnetic levitation model at home for your science project or exhibitions.
This homemade science experiment is done using materials like thermocol, magnet, sketch pen and hot glue gun which is easily available at home at low cost.
What is Magnetic Levitation
The object is suspended with no support other than magnetic fields itself is called Magnetic levitation.

Here the magnetic force is used counteract the effects of the gravitational acceleration and any other accelerations.
Magnetic levitation helps to provide a lifting force. It is termed as pseudo-levitation.
For successful levitation and control of all 6 axes, a combination of superconductors, electromagnets and permanent magnets and attractive and repulsive fields can be used.
Magnetic Levitation Uses
Concept of Magnetic Levitation being used in various application such as below
- maglev trains
- contactless melting
- magnetic bearings
- micro-robotics
Advantages of Magnetic Levitation
Using Magnetic levitation concepts MagLev train is implemented which is faster than the regular bullet train.
This MagLevs train touches the speeds up to 500 kilometers per hour which are due to its lack of wheels.
Disadvantages of Magnetic Levitation
It consumes more power than conventional
How to make magnetic levitation at home step by step video?
In this video, we will show steps by step video instructions on how to build the Magnetic levitation model at home easy way.
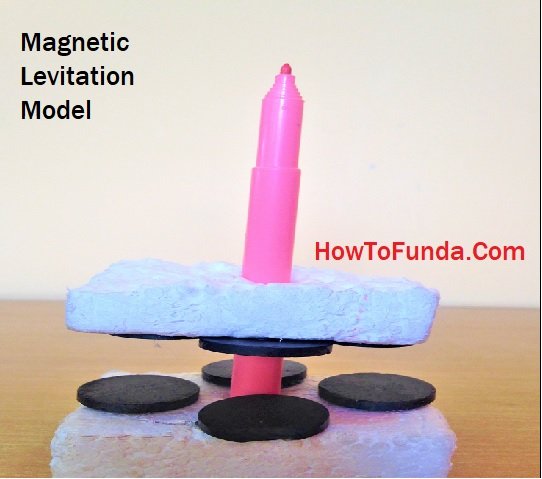
First, take two pieces of rectangular shape thermocol and place them on the flat surface.
Take one piece of thermocol and stick one circular magnet at one end to it with the help of glue gun.
Now take the second circular magnet and stick it to another end of same rectangular thermocol with the help of hot glue.
Make sure that both the circular magnets that are attached to thermocol have the same poles.
Similarly, take the second piece of thermocol and stick two circular magnets to it also.
Next, with the help of sketch pen create a hole at the centre of rectangular thermocol between the circular magnets and make the sketch pen stand firmly on that central hole.
Now place another two circular magnets on one piece of rectangular thermocol.
Create a central hole on another piece of rectangular thermocol and make sure to attach two more magnets to it too.
Next, drop second rectangular thermocol on the first rectangular thermocol bypassing the sketch pen through the central hole.
You will observe that both rectangular pieces will not stick to each other and there will be a small gap between them as shown in the video. This mechanism is called magnetic levitation
Now turn the second rectangular thermocol upside down and pass sketch pen through its central hole.
You will observe that it will fall down completely as shown in the video. This normal magnetism
Materials Used to make magnetic levitation
Materials used in this video are shown below to build Magnetic levitation model at home by taking help of your parents.
- Thermocol
- Magnet
- Sketch
pen
- Hot
Glue gun
Questions & Answers on Magnetic Levitation
1. What are the uses of magnetic levitation?
It is used in pumps, generators, motors, electric power generation, petroleum refining, machine-tool operation and natural gas pipelines.
2. What is the principle of magnetic levitation?
Trains float using principle of magnetic repulsion.
3. Why do magnets float?
Magnet floats because of quantum locking.
Conclusions
Magnetic levitation helps students to learn about how it works and as well how to make it with easily available materials at home.