In this article post we write about Electromagnetic crane working model for science project exhibition – diy
#electromagnet #electromagneticcrane #workingmodel #scienceexhibition #sciencefair #scienceproject #physicsproject #magnetproject #electromagnetic #electromagnet #electromagnetism

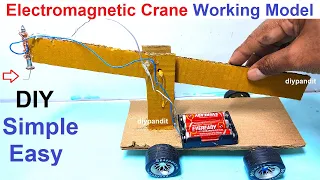
Creating an electromagnetic crane working model is an excellent way to demonstrate the principles of electromagnetism.
Here’s a step-by-step guide to making this model using a 9V battery, wire, nail, copper wire, and cardboard:
Materials Needed:
- 9V battery
- Insulated copper wire (about 24-26 gauge)
- Large iron nail (to serve as the core of the electromagnet)
- Electrical tape
- Cardboard (for the crane structure)
- Scissors or craft knife
- Glue or hot glue gun
- Small switch (optional, for controlling the circuit)
- Paper clips or small metal objects (to pick up with the crane)
Step by Step Video on Electromagnetic crane working model for science project exhibition
1. Prepare the Electromagnet
- Wrap the Copper Wire:
- Take the large iron nail and start wrapping the insulated copper wire around it tightly, leaving about 6 inches of wire free at both ends.
- Wrap the wire neatly in multiple layers, ensuring that the wire is snug and closely packed. More turns will create a stronger magnetic field.
- Secure the Wire:
- Use electrical tape to secure the ends of the wire to the nail to prevent unraveling.
2. Construct the Crane Structure
- Create the Base and Arm:
- Cut a sturdy piece of cardboard to act as the base of the crane.
- Cut another piece to form the arm of the crane. The arm should be long enough to reach out from the base and hold the electromagnet.
- Attach the Arm to the Base:
- Attach the arm to the base using glue or a hot glue gun. You can also use additional pieces of cardboard to create a triangular support structure to hold the arm steady.
3. Assemble the Electromagnetic Crane
- Mount the Electromagnet:
- Attach the iron nail with the wrapped copper wire to the end of the crane arm using glue or electrical tape. Make sure it is secure and can hang freely.
- Connect the Wires:
- Take the free ends of the copper wire and strip off about 1 inch of insulation from each end.
- Connect one end of the wire to one terminal of the 9V battery. You can use electrical tape to secure it or a small battery clip if available.
- Connect the other end of the wire to the other terminal of the battery. If you are using a switch, connect the wire to the switch first, and then connect the switch to the battery terminal.
4. Add the Switching Mechanism (Optional)
- Install the Switch:
- If using a switch, mount it on the base of the crane.
- Connect the free end of the wire from the electromagnet to one terminal of the switch.
- Use another piece of wire to connect the other terminal of the switch to the 9V battery terminal.
5. Test the Electromagnetic Crane
- Activate the Electromagnet:
- Close the switch or directly connect the wires to the battery terminals to complete the circuit. This will allow current to flow through the copper wire, creating a magnetic field around the iron nail.
- Pick Up Metal Objects:
- Use the electromagnet at the end of the crane arm to pick up small metal objects like paper clips or small nails. When the electromagnet is powered, it should attract the metal objects.
- Deactivate the Electromagnet:
- Open the switch or disconnect one of the wires from the battery terminal to turn off the electromagnet and release the metal objects.
By following these steps, you can create an engaging and educational electromagnetic crane model that demonstrates the principles of electromagnetism and its practical applications.