In this post we write about making of the human kidney working model science project for exhibition – diy | biology project

#kidneyworkingmodel #humankidney #scienceexhibition #sciencemodel #scienceproject #biologymodel #biologyproject
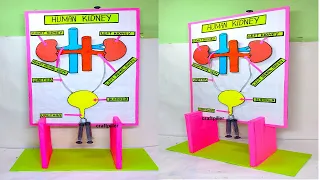
Creating a human kidney working model using cardboard, syringes, pipes, and cardboard organs is a great way to understand the structure and function of the kidneys.
Here’s a step-by-step guide to help you build this model:
Materials Needed:
- Cardboard (for the base and organs)
- Color paper (for detailing organs)
- Syringes (preferably large size)
- Flexible plastic tubing (clear is preferable)
- Scissors
- Glue or tape
- Marker or pen
- Ruler
- Water (for demonstration)
Video Steps by Steps Guides on Human Kidney Working Model
1. Prepare the Base and Organ Structures
- Base Preparation:
- Start with a large piece of cardboard as the base. This will hold the entire model.
- Kidney Structure:
- Cut out kidney shapes from cardboard. You will need two kidney shapes, one for each side of the model.
- Detailed Organs:
- Use color paper to create detailed structures of the organs:
- Renal cortex and medulla
- Renal pelvis
- Ureters (connecting tubes)
- Blood vessels (optional, for more detailed representation)
- Use color paper to create detailed structures of the organs:
2. Construct the Kidney Model
- Assemble the Kidney:
- Layer the kidney shapes to create a 3D representation. Glue or tape the layers together securely.
- Create Internal Structures:
- Use cardboard and color paper to create the internal structures of the kidney, such as the renal cortex, medulla, and renal pelvis.
- Attach these structures inside the kidney model using glue or tape.
3. Add the Tubing and Syringes
- Connect the Ureters:
- Cut flexible plastic tubing into short lengths to represent ureters. Attach these tubes to the renal pelvis area of each kidney shape.
- Simulate Urine Flow:
- Connect syringes to the other ends of the tubing (ureters). These syringes will simulate the flow of urine from the kidneys to the bladder.
- Ensure the syringes are securely attached and can be operated manually to demonstrate urine flow.
4. Assemble and Secure Components
- Secure the Model:
- Attach the kidney structures and tubing to the base cardboard using glue or tape. Ensure all parts are stable and properly aligned.
- Label and Detail:
- Use markers to label each part of the kidney model, such as renal cortex, medulla, renal pelvis, and ureters. This enhances educational value.
5. Testing and Demonstration
- Operate the Model:
- Fill the syringes with water to simulate urine.
- Gently push the plungers of the syringes to demonstrate the flow of “urine” through the ureters from the kidneys.
- Explanation and Engagement:
- Explain the function of each part of the kidney model, including filtration of blood, urine formation, and excretion.
- Encourage viewers to interact with the model by operating the syringes and observing the simulated urine flow.
By following these steps, you can create a detailed and interactive human kidney working model using cardboard, syringes, and tubing.