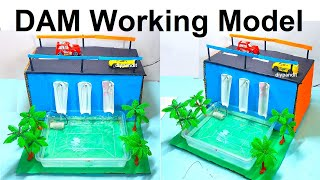
In this post we write about making of the dam working model science project for exhibition – simple and easy updated new design

Creating a dam working model using cardboard, a plastic bottle for water storage, a plastic tray for water reuse, a Fevicol bottle for the dam water flow passage, a DC water pump, and pipes for water flow is a great way to understand the principles of water management and flow systems.
Here’s a step-by-step guide on how to build this dam working model:
Materials You’ll Need:
- Cardboard sheets (for the dam structure and base)
- Plastic bottle (for water storage)
- Plastic tray (for water reuse)
- Fevicol or similar bottle (for water flow passage)
- DC water pump
- Plastic tubing or straws (for water pipes)
- Craft knife or scissors
- Hot glue gun and glue sticks
- Small container (for water reservoir)
- Craft supplies for decoration (markers, stickers, etc.)
Step by Step Video Guide for DAM working model
- Prepare the Base and Dam Structure:
- Cut a piece of cardboard to create the base of your model.
- Cut and assemble cardboard pieces to create the dam structure.
- Water Storage in Dam:
- Attach a plastic bottle to the top of the dam structure to simulate water storage.
- Fill the bottle with water to represent the dam’s reservoir.
- Water Reuse:
- Place a plastic tray at the base of the dam structure to represent the water reuse mechanism.
- The tray will collect water that flows down from the dam.
- Water Flow Passage:
- Cut a Fevicol bottle or similar bottle to create a passage for the water to flow from the dam’s reservoir to the water reuse tray.
- Attach the bottle in a slanted position to facilitate water flow.
- DC Water Pump and Pipes:
- Attach the DC water pump to the bottom of the water storage bottle.
- Connect plastic tubing or straws to the water pump’s outlet.
- Route the tubing from the pump’s outlet down to the water reuse tray.
- Water Reservoir:
- Place a small container near the water reuse tray to serve as the water reservoir.
- This container will catch and recycle the water that flows down.
- Water Flow Test:
- Turn on the water pump to simulate the dam releasing water.
- Observe how the water flows down through the water flow passage and collects in the reuse tray.
- Reuse Mechanism:
- Observe how the water collected in the reuse tray is being pumped back up to the dam’s reservoir.
- Final Touches:
- Decorate the model with labels, signs, and other details to make it visually informative.
This model will help you understand how dams and water management systems work, including water storage, flow, and reuse. It’s an interactive and educational way to learn about water conservation and how human-made structures can impact water resources.
#dam #workingmodel #dammaking #scienceexhibition #sciencefair #scienceproject #dcwaterpump #modelmaking #diy