
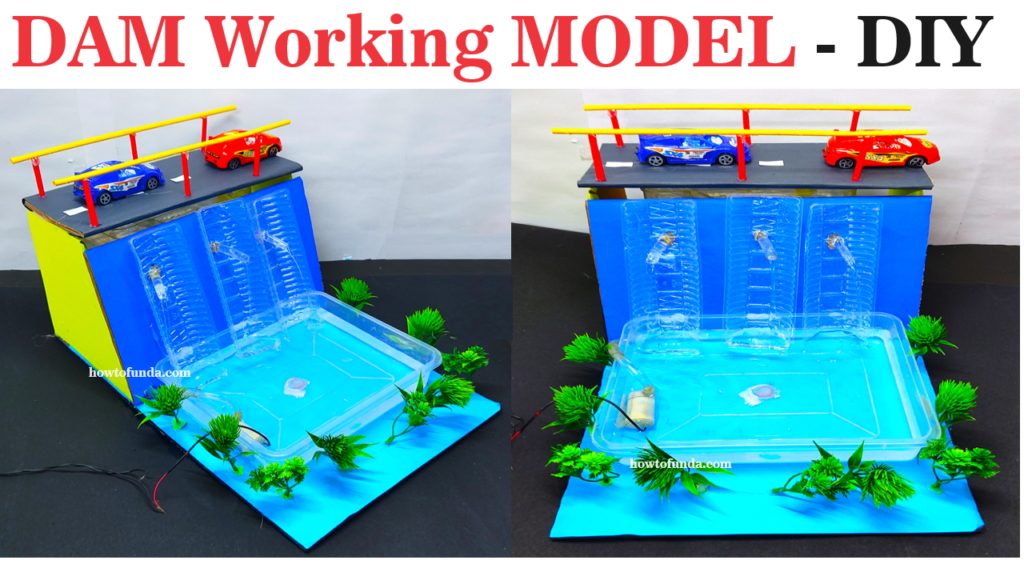
Creating a working model of a dam for a science project exhibition can be both educational and engaging.
Here’s how you can make one using two plastic trays, a DC water pump, cardboard, plants for decoration, a road with cars, and two side hand bridges:
Materials Needed:
- Two plastic trays (one larger and one smaller)
- Cardboard
- DC water pump
- Small tubing or piping
- Decorative plants (e.g., miniature trees, bushes)
- Miniature cars and figures for the road
- Materials for the hand bridges (e.g., popsicle sticks, string)
- Hot glue gun or adhesive
- Water
- Optional: paint, markers, or colored paper for decoration
Step by Step Instructions on dam working model:
- Prepare the Larger Tray (Dam Reservoir):
- Place the larger plastic tray on a stable surface. This will represent the reservoir behind the dam.
- Fill the tray with water to simulate the dam reservoir.
- Build the Dam:
- Use cardboard to create the structure of the dam. Cut out large rectangular pieces for the main body of the dam and smaller pieces for support structures.
- Glue the cardboard pieces together to form the shape of a dam at one end of the larger tray. Ensure that the dam structure is stable and can hold back the water in the reservoir.
- Create the Water Outlet:
- Use tubing or piping to create a channel that leads from the bottom of the reservoir (below the dam) to the smaller plastic tray.
- Place the smaller tray below the outlet to collect the water flowing out of the reservoir.
- Install the DC Water Pump:
- Attach the DC water pump to the smaller tray using adhesive or tape.
- Connect the pump to the tubing or piping leading from the reservoir. This pump will simulate the water being pumped back into the reservoir, creating an infinite loop.
- Decorate the Scene:
- Add decorative plants around the reservoir and along the banks to simulate vegetation.
- Create a road on top of the dam using cardboard or paper. Place miniature cars and figures on the road to represent traffic.
- Construct the Hand Bridges:
- Use popsicle sticks or cardboard to create hand bridges on either side of the dam.
- Attach string or thin strips of cardboard to simulate railings or handrails on the bridges.
- Test the Model:
- Turn on the water pump and observe the flow of water from the reservoir to the smaller tray, and back again.
- Ensure that the pump is functioning properly and that the water flows smoothly through the system.
- Optional: Customize and Decorate:
- Use paint, markers, or colored paper to add details and decoration to the dam, bridges, road, and surroundings.
- Add labels or signs to explain different parts of the model and how they function.
By following these steps, you can create a working model of a dam for your science project exhibition. This model demonstrates the basic principles of water flow, dam construction, and the role of pumps in water management.