In this article we write about making car using chopsticks and DC Motor | Science Project
#howtomake #car #chopsticks #dcmotorproject #dcmotorscienceproject #diypandit #scienceproject #scienceexhibition #sciencefair #workingmodel #workingproject

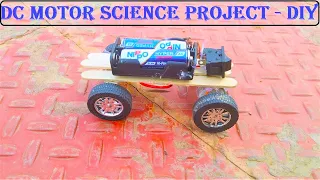
Making a car using chopsticks, a DC motor, a 9V battery, and wheels is a fun and educational project. Below is a step-by-step guide to help you build this simple car model:
Materials Needed
- Chopsticks (4 for the body and axles)
- DC motor
- 9V battery
- On/off switch (optional)
- Wheels (4 small wheels, can be from a toy car or purchased separately)
- Wires
- Tape or glue
- Small screws or fasteners
- Rubber bands (optional, for traction)
Tools Needed
- Scissors or wire cutters
- Screwdriver
Step by Steps on how to make car using chopsticks and DC Motor
1. Prepare the Chopsticks
- Main Frame:
- Use two chopsticks as the main body frame of the car. These will serve as the chassis and support structure.
- Place them parallel to each other, with enough space in between for the wheels to fit.
- Axles:
- Cut two more chopsticks to the desired length for the axles of the car.
- These should be long enough to extend slightly beyond the width of the car body to accommodate the wheels.
2. Mount the Wheels
- Attach Wheels to Axles:
- Attach the wheels to each end of the axles using small screws or fasteners. Ensure the wheels can rotate freely.
- Position Axles:
- Attach the axles to the underside of the car body (chopsticks) using tape or glue.
- Ensure they are securely fastened and positioned evenly to maintain balance.
3. Install the DC Motor
- Motor Placement:
- Position the DC motor at the rear or front of the car body, depending on your design preference.
- Securely attach the motor using tape or glue.
- Connect Motor to Wheels:
- Use small rubber bands or tape to attach the motor shaft to one of the axles.
- When the motor rotates, it will turn the axle and subsequently move the car forward or backward.
4. Wiring and Power
- Battery Setup:
- Connect the 9V battery to the DC motor using wires. Ensure the polarity (+ and -) is correctly matched.
- Optionally, add an on/off switch between the battery and motor for easy control.
5. Testing and Final Adjustments
- Test the Car:
- Place the car on a flat surface and turn on the battery.
- The motor should engage and start rotating the wheels, causing the car to move.
- Adjustments:
- Fine-tune the position of the motor and axles for optimal performance and stability.
- Ensure all connections are secure to prevent any parts from coming loose during operation.
By following these steps, you’ll create a functional chopstick car model powered by a DC motor and 9V battery. This project not only enhances creativity but also provides an engaging way to learn about basic engineering concepts and motion dynamics.