In this blog post we write about the steps on how to make Seismograph Working Model Making To Measure Earthquakes with your own for inspire award winning science project
Creating a working model of a seismograph using simple materials like rubber bands, a cardboard box, a pen, and white paper can be a fun and educational project. This model will demonstrate the basic principles of how a seismograph works to detect and record seismic waves. Here’s how to build it:
Materials Needed:
- Cardboard box (a shoebox size is ideal)
- Rubber bands
- Pen or marker
- White paper
- Scissors or craft knife
- Tape or glue
- Small weights (like washers or small stones)
- Ruler
#howtomake #seismograph #workingmodel #earthquakemodel #diypandit #inspireaward #scienceproject #scienceexhibition #sciencefair #scienceworkingmodel #diy

Step by Step instructions on make Seismograph Working Model
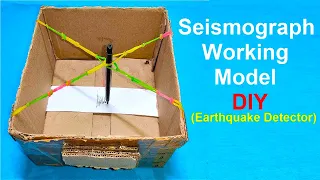
- Prepare the Cardboard Box:
- Cut the Lid: Cut off the lid of the cardboard box to create an open-top structure. This will be the main body of the seismograph.
- Cut Slots: Cut two horizontal slots on the opposite sides of the box, near the top edge. These slots will hold the rubber bands that suspend the pen.
- Set Up the Suspension System:
- Attach Rubber Bands: Stretch two rubber bands across the slots you cut, so they are parallel to each other and span the width of the box. Secure them in place with tape or glue if necessary.
- Pen Holder: Attach a pen or marker to a small piece of cardboard (about 2 inches by 1 inch) using tape or glue. The pen should be positioned vertically with the tip facing downward.
- Attach to Rubber Bands: Tape or glue the cardboard piece with the pen to the rubber bands, so the pen hangs vertically and can move freely up and down.
- Prepare the Recording Surface:
- Paper Platform: Cut a piece of cardboard slightly smaller than the base of the box to act as a platform for the paper. Ensure it can slide back and forth along the bottom of the box.
- Attach Paper: Tape a piece of white paper to the cardboard platform. This will be the recording surface where the pen will mark the movements.
- Add Weights for Stability:
- Stabilize the Pen Holder: Attach small weights (like washers or small stones) to the bottom of the cardboard piece holding the pen. This helps stabilize the pen and ensures it marks the paper effectively.
- Assemble the Seismograph:
- Place the Paper Platform: Place the cardboard platform with the paper at the bottom of the box.
- Adjust the Pen: Ensure the pen’s tip is lightly touching the paper. You might need to adjust the height by adding or removing rubber bands or adjusting their tension.
- Simulate Seismic Activity:
- Shake the Box: Gently shake the box or tap the table it’s on to simulate seismic activity. The pen should move in response to the vibrations, marking the paper.
- Record the Movements: Slowly slide the paper platform sideways as you shake the box to create a continuous record of the vibrations. This simulates the way a real seismograph records seismic waves over time.
Explanation of the Science:
- Seismograph Principle: A seismograph detects and records seismic waves. In this model, the rubber bands and pen simulate the detection mechanism, while the paper records the movements.
- Inertia: The pen stays relatively stationary due to inertia while the box moves around it, causing the pen to mark the paper and record the vibrations.
- Recording Seismic Waves: The marks on the paper represent the seismic waves. The amplitude and frequency of the marks can give information about the strength and nature of the simulated earthquake.