Creating a working model to demonstrate different types of friction using cardboard and a rotatable mechanism with a nut and bolt can be an engaging physics project for a science exhibition.

Below is a step-by-step guide to help you build this friction types working model:
Materials Needed:
- Cardboard
- Ruler
- Pencil
- Craft knife or scissors
- Nut and bolt
- Small wooden block or dowel
- Sandpaper
- Glue or tape
- Colored paper or markers
- Protractor (optional)
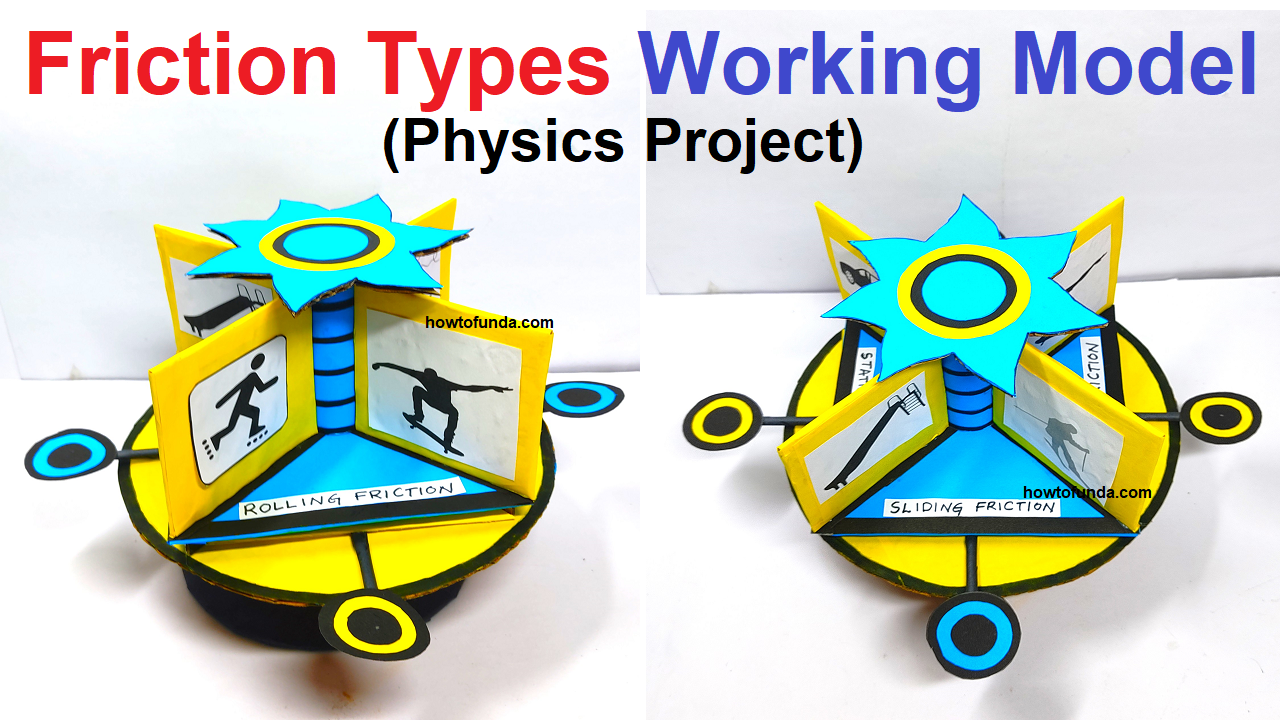
Types of Friction to Represent:
- Static Friction:
- Definition: Static friction is the force that opposes the initiation of motion between two surfaces at rest relative to each other.
- Example: Consider a book placed on a table. The force preventing the book from sliding is static friction. It comes into play as long as the book is at rest on the table.
- Kinetic Friction:
- Definition: Kinetic friction is the force that opposes the motion of two surfaces sliding past each other.
- Example: Once the book on the table starts sliding, the force resisting its motion is kinetic friction. It acts while the surfaces are in motion.
- Rolling Friction:
- Definition: Rolling friction is the force that opposes the motion of a rolling object, such as a wheel or a ball.
- Example: When a wheel rolls on the ground, rolling friction acts between the wheel and the surface it rolls on. This type of friction is generally lower than kinetic friction for sliding objects.
- Fluid Friction:
- Definition: Fluid friction, also known as drag, is the force that opposes the motion of an object through a fluid (liquid or gas).
- Example: Consider a swimmer moving through water. The resistance the swimmer feels while moving is due to fluid friction. Similarly, air resistance acting on a moving car is a form of fluid friction.
Steps to Create the Friction Types Working Model:
Step 1: Prepare the Base:
- Cut a large piece of cardboard to serve as the base for your model. This will be the foundation for the rotatable mechanism.
Step 2: Create Rotatable Mechanism:
- Attach a small wooden block or dowel vertically to the center of the cardboard base using glue or tape.
- Insert a bolt through the wooden block or dowel and secure it with a nut. Ensure that the bolt allows for easy rotation.
Step 3: Create Three Sections:
- Cut the cardboard into three sections, each representing a different type of friction. You can use the ruler and craft knife to ensure equal sizing.
Step 4: Label Each Section:
- Label each section with the type of friction it represents: “Static Friction,” “Kinetic Friction,” and “Rolling Friction.”
Step 5: Decorate Sections (Optional):
- Use colored paper or markers to decorate each section. This step is optional but can enhance the visual appeal of your model.
Step 6: Attach Sections to the Bolt:
- Attach each cardboard section to the bolt in a way that allows them to rotate independently. You may use additional nuts to create spaces between the sections.
Step 7: Sandpaper for Kinetic Friction:
- Attach a small piece of sandpaper to the section representing kinetic friction. This simulates a rough surface.
Step 8: Display and Demonstrate:
- Set up your friction types working model at the exhibition table.
- Rotate the bolt to demonstrate the different types of friction and explain their characteristics.
This friction types working model provides a visual and interactive representation of different types of friction, making it an effective way to explain fundamental physics concepts.
It engages viewers by allowing them to observe and understand the role of friction in various situations.