In this post we write of making of SOLAR SYSTEM Working Model SCIENCE PROJECT | DIY HOME | Science Project – Solar System Model 3D Model
Creating a solar system working model with a glowing light bulb using AC power can be an exciting and visually engaging project.

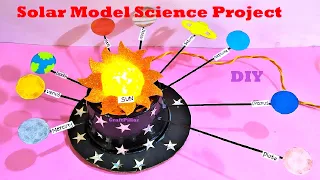
The model will showcase the planets made from cardboard and color paper, connected by sticks, with the sun and planets placed on top of containers at the center.
Keep in mind that working with AC power requires proper electrical knowledge and safety precautions. If you are unsure about handling AC power, consider using a battery-powered LED light source instead.
Materials needed:
- Cardboard (for the base and structures)
- Color paper (for representing planets and other elements)
- Sticks or dowels
- Containers (for supporting the sun and planets)
- Light bulb socket with a plug (for AC power connection)
- AC power source or a battery-powered LED light
- Wires (for connecting the light bulb socket to the power source)
- Scissors
- Glue or double-sided tape
- Marker pens or sketch pens
Step-by-step instructions:
- Base:
- Cut a large circular or square piece of cardboard to serve as the base for the model.
- Sun and Planets:
- Use color paper to create the sun and the planets of the solar system.
- Cut out large circles for the sun and smaller circles for the planets.
- Paint or decorate the circles with the appropriate colors for each planet (e.g., orange for Mars, blue for Earth, etc.).
- Label each planet with its name using marker pens.
- Sticks and Planet Placement:
- Attach sticks or dowels to the backside of each planet.
- Position the planets in their respective order from the sun, and insert the other end of the sticks into the containers at the center of the base.
- Sun Placement:
- Place the sun (large circle) on top of the container at the center of the base, slightly elevated above the planets.
- Wiring and Light Source:
- If using an AC light bulb, wire the light bulb socket to a plug and connect it to an AC power source. Make sure to follow electrical safety guidelines and take appropriate precautions when dealing with AC power.
- If using a battery-powered LED light, simply insert the LED light into the center of the sun.
- Glowing Effect:
- Turn on the AC power or the LED light source to make the sun glow, representing the light and heat emitted by the sun.
- Labeling and Details:
- Use marker pens or sketch pens to label the sun and each planet with their respective names.
- Decorating the Model:
- Use markers or color paper to decorate the model and add more details to make it visually appealing.
Now, you have an interactive solar system working model with a glowing light bulb (or LED) representing the sun and cardboard planets connected by sticks. This model allows you to observe the arrangement of planets around the sun and visually represent the solar system’s hierarchy.
#solarsystem #modelmaking #ScienceProject #CraftPIllar #SCIENCEFAIR #sstproject #scienceexhibition #sciencemodel