To provide learners with an opportunity to explore the structure and composition of the solar system, including the Sun, planets, moons, and other celestial objects. The model serves as a visual aid for understanding the relative sizes, distances, and orbital motions of these bodies.
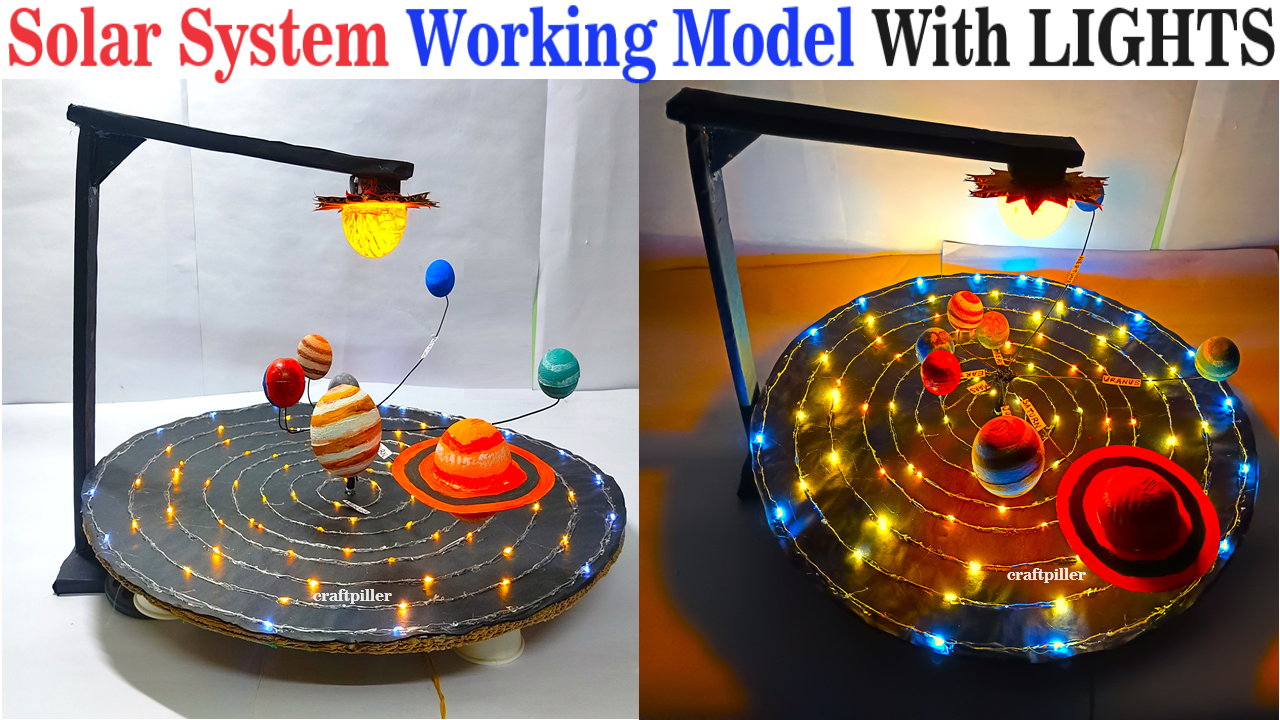
Creating a solar system working model with LED lights and a slow-running motor to simulate the movement of planets is an excellent educational project.
Here’s a step-by-step guide to making it:

Materials Needed:
- Large circular base (cardboard or wood)
- Styrofoam balls or small spheres (to represent planets)
- LED lights (one for the sun and smaller ones for planets)
- Slow-running motor
- Batteries or power supply for the motor and LEDs
- Wires
- Small switches (optional)
- Paints or colored paper
- Hot glue gun or adhesive
- String or thin wire
- Scissors
- Marker
Steps by Steps Video Instructions on Solar system working model with lights:
1. Prepare the Base:
- Use a large circular base as the foundation for your model.
- Paint the base black or cover it with black paper to represent space.
2. Create the Sun:
- Use a larger LED light to represent the sun.
- Attach it to the top center of the base using hot glue or adhesive.
- You can paint the LED light yellow or orange to resemble the sun.
3. Make the Planets:
- Determine the order of the planets from the sun (Mercury, Venus, Earth, Mars, Jupiter, Saturn, Uranus, Neptune).
- Paint or cover the styrofoam balls with colored paper to represent each planet. Use reference images for accuracy.
- Attach smaller LED lights to each planet using hot glue.
- For each planet, leave a wire tail attached to the LED light. This wire will connect to the motor for rotation.
4. Arrange the Planets:
- Position the planets in their respective orbits around the sun on the base.
- Use string or thin wire to hang the planets at different distances from the sun.
- Ensure that the orbits are correctly spaced according to the actual solar system.
5. Install the Motor:
- Mount the slow-running motor on the base.
- Position it at the center of the base, just below the sun.
- Ensure the motor is securely attached and aligned.
6. Connect the Motor and LEDs:
- Connect each LED representing the planets to the motor using wires.
- Attach one end of each wire to the LED and the other end to the motor.
- Make sure the wires are long enough to allow the planets to rotate freely.
- Connect the positive terminal of the LEDs to the positive terminal of the motor and similarly for the negative terminals.
7. Test Rotation:
- Turn on the motor and LEDs to test the rotation of the planets.
- Adjust the speed of the motor if necessary to achieve a slow and steady rotation.
- Check that the planets move smoothly in their orbits around the sun.
8. Optional: Add Switches:
- Install small switches between the LEDs and the power supply to control each planet’s light individually.
- This allows you to turn on or off the lights of specific planets for demonstration purposes.
9. Label and Explain:
- Use a marker to label each planet and provide information about it.
- Explain the key features of the solar system, such as planet size, distance from the sun, and unique characteristics.
With these steps, you can create an engaging and informative solar system working model that demonstrates the movement of planets around the sun.