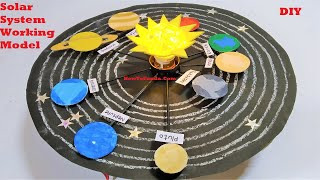
We provided the detailed steps on how to make the solar system working model for science exhibition project at home using cardboard and waste materials

Creating a solar system working model with a big circle base, paper planets, a light bulb as the Sun, and a rotatable setup using a slow-running motor is a fantastic and engaging project.
Here’s a detailed guide on how to make this model:
Materials Needed:
- Large Circular Base: Use sturdy cardboard or plywood.
- Light Bulb: Small, low-wattage bulb to represent the Sun.
- Slow-running Motor: A motor with a gear reduction for slow rotation.
- Battery Pack: To power the motor and light bulb.
- Paper or Foam Balls: To represent the planets.
- Paint or Markers: For decorating the planets.
- Wire: For electrical connections.
- Switch: To turn the light bulb and motor on and off.
- Glue or Tape: For assembly.
- Scissors and Craft Knife: For cutting.
- Ruler and Compass: For measuring and drawing circles.
- Small Rods or Dowels: To mount the planets.
- Hot Glue Gun: For securing parts.
Video guide on solar system working model for science exhibition project
1. Prepare the Circular Base:
- Cut out a large circle from cardboard or plywood. This will be the base of your solar system model.
- Optionally, paint the base black or dark blue to represent space.
2. Create the Planets:
- Use paper or foam balls of different sizes to represent each planet.
- Paint and decorate the planets to resemble their actual appearance. Refer to images of the planets for accuracy.
3. Mount the Light Bulb (Sun):
- Securely attach the light bulb at the center of the circular base.
- Connect the light bulb to the battery pack using wires, ensuring you include a switch in the circuit to turn the bulb on and off.
4. Attach the Motor:
- Mount the slow-running motor under the base, ensuring the shaft extends through a hole in the center of the base.
- Attach a small platform or disc to the motor’s shaft to hold the rods or dowels for the planets.
5. Create Planet Arms:
- Cut small rods or dowels to different lengths to hold each planet.
- Attach one end of each rod to the small platform or disc on the motor’s shaft. The other end will hold a planet.
6. Secure the Planets:
- Attach each planet to the end of its respective rod using glue or tape.
- Ensure the planets are spaced correctly to represent their positions relative to the Sun.
7. Connect the Electrical Components:
- Connect the motor to the battery pack, including a switch in the circuit to control the motor.
- Double-check all connections to ensure they are secure and safe.
8. Final Assembly and Testing:
- Place the circular base on a stable surface.
- Turn on the switch to power the light bulb, representing the Sun.
- Turn on the motor to start the slow rotation, making the planets orbit the Sun.
Conclusion:
This working model of the solar system is a visually engaging way to demonstrate the planetary orbits around the Sun. The combination of a light bulb, rotating motor, and decorated planets makes for an educational and impressive project. Enjoy building and displaying your solar system model!
#solarsystem #workingmodel #craftpiller #scienceproject #scienceexhibition #sciencemodel #sciencefair #scienceproject