A solar eclipse and a lunar eclipse are fascinating celestial events that occur when the Earth, the moon, and the sun align in specific ways.
Solar Eclipse
During a solar eclipse the moon comes between the Earth and the sun, blocking out the sunlight. This happens when the moon is in its new moon phase.
It casts a shadow on Earth, temporarily turning day into night in the affected areas. There are two types of solar eclipses: total and partial.
In a total solar eclipse, the sun is completely obscured by the moon, creating a breathtaking sight of a darkened sky with a radiant ring, known as the solar corona, around the moon.
In a partial solar eclipse, only a part of the sun is covered, resulting in a crescent-shaped sun.
Lunar eclipse
A lunar eclipse, on the other hand, occurs when the Earth comes between the sun and the moon, causing Earth’s shadow to fall on the moon.
This takes place during a full moon. A lunar eclipse can be total, partial, or penumbral. In a total lunar eclipse, the moon turns a reddish hue due to sunlight bending through Earth’s atmosphere.
It’s often referred to as a “blood moon.” In a partial lunar eclipse, only a portion of the moon is shaded, and in a penumbral lunar eclipse, the moon passes through Earth’s outer shadow, causing a subtle darkening.
Both solar and lunar eclipses are awe-inspiring celestial displays that captivate sky watchers around the world.
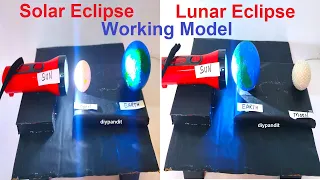
In this blog post we are giving you the instruction on how to make the solar eclipse – lunar eclipse working model(earth rotation) for science project – diy
#solareclipse #lunareclipse #workingmodel #earthrotation #scienceproject #diypandit #scienceproject #scienceexhibition #sciencefair #sstproject #socialscienceproject

Step By Step Guide on How to make solar eclipse – lunar eclipse working model(earth rotation) for science project – diy
In this project, we’ll create a dynamic moon phases model using a small white ball to represent the moon, a torch light as the sun, a ball for the Earth, a DC motor for rotation, and a switch for control. Here are the steps:
Materials Needed:
- Small white ball (to represent the moon)
- Torch light (as the sun)
- A ball (to represent the Earth)
- DC motor with switch
- Power source for the motor (e.g., battery pack)
- Wires and connectors (for the electrical connections)
- Cardboard or a base to mount the Earth
- Small stick or wire (for mounting the Earth)
- Optional: Gears or pulleys (for mechanical advantage)
Building the Moon Phases Model:
1. Preparing the Moon:
Step 1: Take a small white ball to represent the moon.
2. Preparing the Earth:
Step 2: Decorate the ball (representing the Earth) with paints or markers to depict continents, oceans, etc.
Step 3: Mount the Earth on a stick or wire. You may need to use glue or adhesive to secure it in place.
3. Setting Up the Sun:
Step 4: Use a torch light as the “sun” in your model. Position it above the Earth.
4. Building the Base:
Step 5: Cut out a rectangular piece of cardboard to serve as the base. Attach the Earth and the torch light to this base.
5. Adding the Rotating Mechanism:
Step 6: Attach a DC motor to the base of the model. Position it in a way that it can rotate the Earth.
Step 7: Connect the motor to a switch for on/off control.
Step 8: Connect the motor to a power source (e.g., battery pack).
Optional: You can use gears or pulleys to create a mechanical advantage and ensure smoother rotation.
6. Demonstrating the Phases:
Step 9: Turn on the motor using the switch. This will start the rotation of the Earth.
Step 10: As the Earth rotates, observe how the moon phases change relative to the Earth and the “sun.” This simulates the different moon phases.
7. Labeling and Detailing:
Step 11: Label each phase of the moon (New Moon, First Quarter, Full Moon, Last Quarter) on the respective phases.
Your moon phases working model with rotation is now complete!
This dynamic model provides a visual representation of how the moon’s appearance changes as it orbits the Earth. It’s an engaging educational tool for learning about the different phases of the moon with an added element of interactivity.