In this post we show you how to Make simple circuit working models in a fantastic way to understand the basics of electrical circuits.
What is simple circuit & How does a simple circuit work?
In physics, a simple circuit is an electric circuit that consists of a power source, conductive path, and a load. The power source, typically a battery, provides the necessary voltage to drive the electric current through the circuit.
Conductive wires made of materials like copper or aluminum connect the components, allowing the current to flow.
The load, such as a light bulb or resistor, consumes the electrical energy, converting it into other forms of energy like light, heat, or mechanical work.
A switch is often included to control the circuit, allowing the current to be turned on or off.
A simple circuit operates based on the principles of Ohm’s Law, which relates the voltage (V), current (I), and resistance (R) in the circuit with the equation V=IRV = IRV=IR.
When the switch is closed, it completes the circuit, enabling current to flow from the positive terminal of the power source, through the conductive path, through the load, and back to the negative terminal.
This flow of electric charge powers the load, demonstrating basic concepts of electricity and circuit behavior.
simple circuit working model picture

Making of the two simple circuit projects
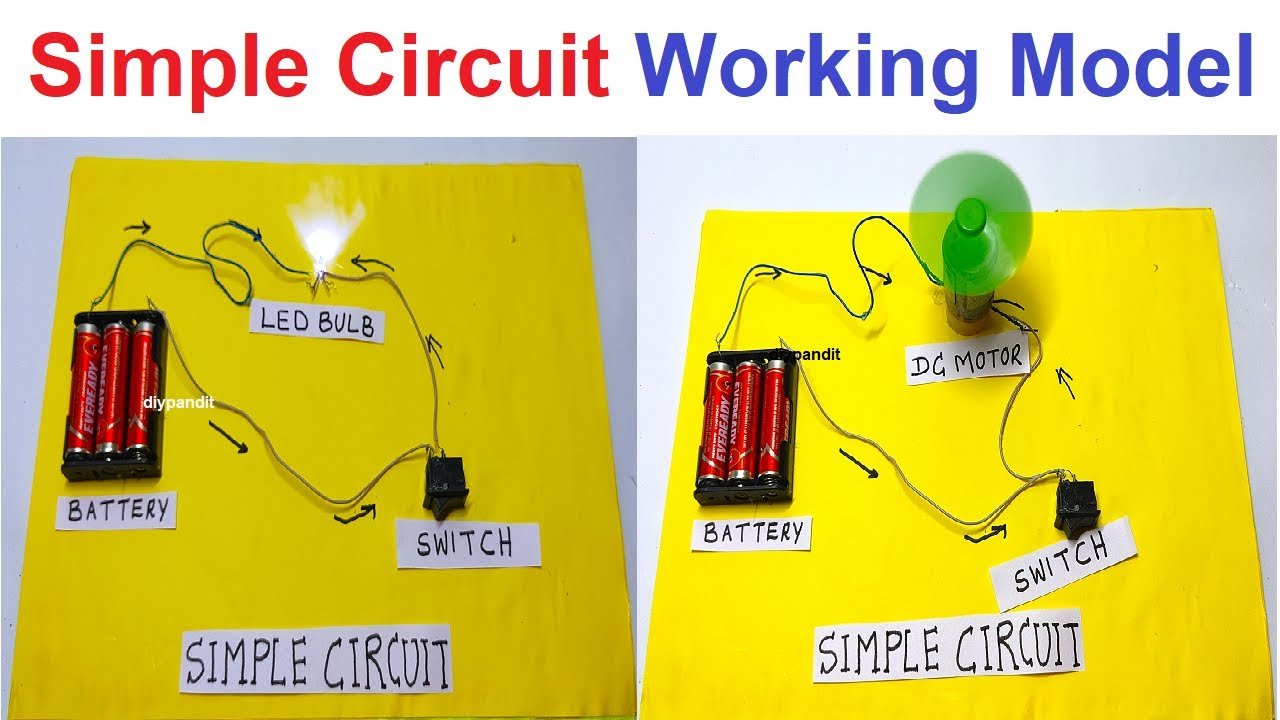
Here are the two simple circuit projects: one with an LED light option and another with a small fan option (using a DC motor).
Project 1: Simple LED Circuit
Materials Needed:
- 9V battery
- Battery clip
- LED light (make sure it’s rated for 9V or use a resistor to prevent it from burning out)
- Resistor (optional, if the LED is not rated for 9V, typically a 330 ohm resistor)
- Switch (single-pole single-throw)
- Wires
- Cardboard (for mounting)
- Hot glue gun and glue sticks
- Electrical tape
Step by Step Video Instructions Simple LED Circuit:
- Prepare the Base:
- Cut a piece of cardboard to act as the base for your model.
- Mount the Components:
- Secure the 9V battery to the cardboard using hot glue.
- Mount the switch on the cardboard base.
- Wiring the Circuit:
- Connect the battery clip to the 9V battery.
- Attach one wire from the battery clip to one terminal of the switch using electrical tape.
- Connect a wire from the other terminal of the switch to the longer leg (anode) of the LED.
- If using a resistor, connect the other leg of the LED (cathode) to one end of the resistor.
- Connect the other end of the resistor (or directly from the LED if not using a resistor) to the negative wire from the battery clip.
- Secure Connections:
- Use electrical tape to secure and insulate all wire connections.
- Testing:
- Turn on the switch to complete the circuit. The LED should light up.
Project 2: Simple Fan Circuit
Materials Needed:
- 9V battery
- Battery clip
- Small DC motor
- Small fan blade (that fits onto the motor shaft)
- Switch (single-pole single-throw)
- Wires
- Cardboard (for mounting)
- Hot glue gun and glue sticks
- Electrical tape
Step by Step video Instructions Simple Fan Circuit:
- Prepare the Base:
- Cut a piece of cardboard to act as the base for your model.
- Mount the Components:
- Secure the 9V battery and the DC motor to the cardboard using hot glue. Ensure the motor shaft is free to rotate without obstruction.
- Mount the switch on the cardboard base.
- Wiring the Circuit:
- Connect the battery clip to the 9V battery.
- Attach one wire from the battery clip to one terminal of the switch using electrical tape.
- Connect a wire from the other terminal of the switch to one terminal of the DC motor.
- Connect the other terminal of the DC motor to the remaining wire from the battery clip.
- Secure Connections:
- Use electrical tape to secure and insulate all wire connections.
- Attach the Fan Blade:
- Secure the fan blade onto the shaft of the DC motor.
- Testing:
- Turn on the switch to complete the circuit. The motor should spin, causing the fan blade to rotate.
Simple LED circuit project Explanation:
This model uses a 9V battery, a switch, and an LED to show how a basic electrical circuit works.
- Battery: The 9V battery provides the electrical energy needed to power the LED.
- Switch: The switch allows us to control the flow of electricity in the circuit. When the switch is turned on, the circuit is complete, allowing current to flow and light up the LED.
- Resistor: If used, the resistor limits the current to prevent the LED from burning out.
Fan Circuit project Explanation:
This model uses a 9V battery, a switch, and a DC motor to show how a basic electrical circuit can drive a mechanical device.
- Battery: The 9V battery provides the electrical energy needed to power the motor.
- Switch: The switch controls the flow of electricity in the circuit. When the switch is turned on, the circuit is complete, allowing current to flow and spin the motor.
- Motor: The DC motor converts electrical energy into mechanical energy, causing the attached fan blade to rotate and create airflow.
These projects illustrate fundamental principles of electricity and circuits, showing how simple components can be combined to create functional devices.