Introduction to Photosynthesis: Harnessing Sunlight for Life
Photosynthesis is one of the most fundamental and crucial processes in the living world, serving as the primary mechanism through which plants, algae, and certain bacteria convert light energy into chemical energy.
This intricate process plays a central role in sustaining life on Earth by producing oxygen and providing the foundation for food chains.
Definition:
Photosynthesis is a biochemical process that occurs in the chloroplasts of plant cells, algae, and some bacteria.
It involves the conversion of light energy into chemical energy in the form of glucose, a sugar that serves as an essential source of energy for living organisms.
Key Components of Photosynthesis :
- Chloroplasts: Photosynthesis takes place within specialized organelles called chloroplasts, primarily found in the cells of green plants. These chloroplasts contain the pigment chlorophyll, which is crucial for capturing light energy.
- Chlorophyll: Chlorophyll is the green pigment responsible for absorbing light energy from the sun. It is crucial for initiating the photosynthetic process.
- Light Energy: Sunlight provides the energy needed for photosynthesis. Plants and other photosynthetic organisms capture sunlight through their chlorophyll molecules.
- Carbon Dioxide (CO2): Carbon dioxide, a gas present in the atmosphere, is taken up by plants and used as a carbon source during the photosynthetic process.
- Water (H2O): Water is absorbed by the roots of plants and transported to the chloroplasts, where it is split into oxygen and hydrogen during photosynthesis.
Stages of Photosynthesis:
Photosynthesis can be broadly divided into two main stages:
- Light-dependent Reactions: These reactions occur in the thylakoid membrane of the chloroplasts and involve the absorption of light energy by chlorophyll. This energy is then used to split water molecules into oxygen, protons, and electrons.
- Light-independent Reactions (Calvin Cycle): Taking place in the stroma of the chloroplasts, the Calvin Cycle utilizes the products of the light-dependent reactions (ATP and NADPH) to convert carbon dioxide into glucose through a series of chemical reactions.
Significance of Photosynthesis:
- Oxygen Production: One of the most critical contributions of photosynthesis is the production of oxygen. Plants release oxygen into the atmosphere as a byproduct of the process, sustaining life for many organisms.
- Food Production: Photosynthesis is the foundation of the food chain. Plants, as primary producers, create organic compounds (glucose) that serve as the primary energy source for herbivores and, subsequently, carnivores.
- Carbon Dioxide Reduction: Photosynthesis plays a crucial role in reducing atmospheric carbon dioxide levels, contributing to the balance of greenhouse gases in the Earth’s atmosphere.
- Energy Storage: The glucose produced through photosynthesis serves as a form of stored energy for plants, which can be utilized during periods when sunlight is not available.
In summary, photosynthesis is a marvel of nature that sustains life on our planet. Its intricate process highlights the interconnectedness of living organisms and showcases the remarkable ability of plants to harness sunlight and convert it into the energy needed for growth, development, and the maintenance of the Earth’s delicate ecosystems.
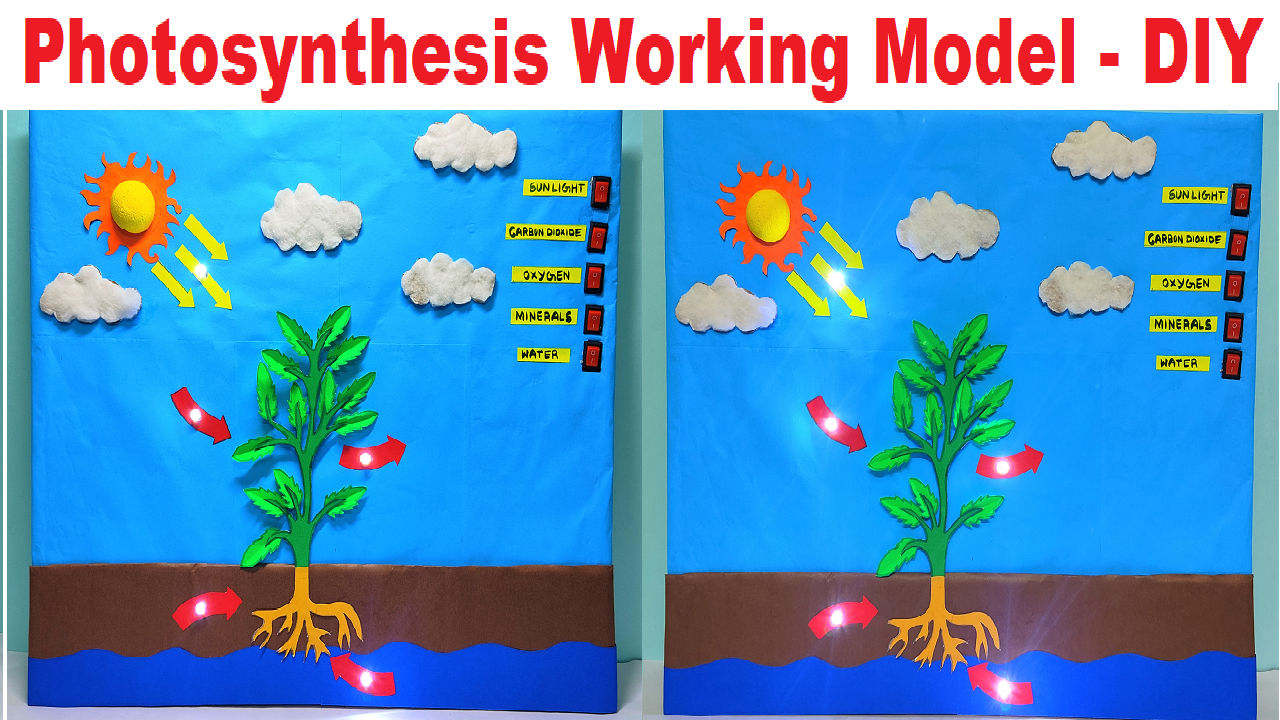
Creating a photosynthesis model
Creating a photosynthesis model is a great way to understand and visualize the process by which plants convert light energy into chemical energy to produce food.

Here’s a simple and easy-to-make photosynthesis model using basic materials:
Materials Needed:
- Green paper or cardstock (for leaves)
- White paper or cardstock (for labels and background)
- Scissors
- Glue
- Pencil or marker
- Colored markers or crayons (optional, for decorating)
Step-by-Step Instructions:
- Draw and Cut Out Leaves: Start by drawing the shape of leaves on the green construction paper or cardstock. You can draw simple leaf shapes or get creative with different leaf designs. Cut out the leaves using scissors.
- Prepare Labels: On the white paper or cardstock, write labels for the different components involved in photosynthesis. For example, you can write “Sunlight,” “Carbon Dioxide,” “Water,” “Chlorophyll,” “Oxygen,” and “Glucose.”
- Glue Labels to Leaves: Glue the labels on the appropriate leaves to indicate their roles in the photosynthesis process. For example, you can glue the “Sunlight” label on one leaf, “Carbon Dioxide” label on another leaf, and so on.
- Arrange the Model with lights : Take a larger piece of white paper or cardstock as the background of your model. Arrange the leaves with their labels in a line or circle to represent the photosynthesis process flow.
- Explain the Process: Once your photosynthesis model is complete, use it to explain the process of photosynthesis. Describe how sunlight is absorbed by the chlorophyll in the leaves, how carbon dioxide and water are taken in from the environment, and how the plant converts these ingredients into oxygen and glucose through the process of photosynthesis.
Step by Step video instructions on photosynthesis working model
https://www.youtube.com/@craftpiller
.