The phases of the moon are the different appearance of the moon as seen from Earth. These phases occur due to the relative position of the moon, Earth and the sun. The main phases of the moon are:
- New Moon
- Waxing Crescent
- First Quarter
- Waxing Gibbous
- Full Moon
- Waning Gibbous
- Third Quarter
- Waning Crescent
phases of moon working model – diy – simple and easy – science project | howtofunda | lunar & solar eclipse #phasesofmoon #workingmodel #sciencemodel #sciencefair #scienceexhibition #scienceproject #solarsytem #space #solareclipse #lunareclipse

Step by Step Video Instructions in making of phases of moon working model
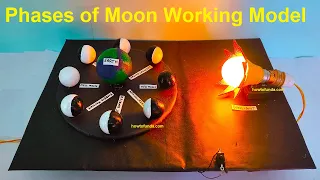
In this project, we’ll create an interactive moon phases model using small balls to represent the moon phases, a light bulb decorated as the sun, a ball decorated as the Earth, a DC motor for rotation, and a switch to control the motion. Here are the steps:
Materials Needed:
- Small balls (Styrofoam or ping pong balls)
- A light bulb
- A ball (to represent the Earth)
- Paints or markers (to decorate the Earth and light bulb)
- Glue or adhesive
- Cardboard or a base to mount the Earth
- A small stick or wire
- A DC motor with switch
- Power source for the motor (e.g., battery pack)
- Wires and connectors (for the electrical connections)
- Small gears or pulleys (optional, for mechanical advantage)
Building the Enhanced Moon Phases Model:
1. Preparing the Earth:
Step 1: Paint or decorate the ball to represent the Earth. Add details like continents, oceans, and any other features you’d like.
Step 2: Mount the Earth on a stick or wire. You may need to use glue or adhesive to secure it in place.
2. Creating the Moon:
Step 3: Take several small balls to represent the moon. You’ll need at least 8 to demonstrate the main phases.
Step 4: Paint or mark each ball to represent the different phases of the moon. These phases include New Moon, First Quarter, Full Moon, and Last Quarter.
3. Setting Up the Model:
Step 5: Attach the light bulb in a way that it acts as the “sun” in your model. You can place it above the Earth.
Step 6: Position the Earth so that it’s between the “sun” (light bulb) and the moons. This represents the Earth-Moon-Sun system.
4. Adding the Rotating Mechanism:
Step 7: Attach a DC motor to the base of the model. Position it in a way that it can rotate the Earth.
Step 8: Connect the motor to a switch for on/off control.
Step 9: Connect the motor to a power source (e.g., battery pack).
Optional: You can use gears or pulleys to create a mechanical advantage and ensure smoother rotation.
5. Demonstrating the Phases:
Step 10: Turn on the motor using the switch. This will start the rotation of the Earth.
Step 11: As the Earth rotates, observe how the moons’ positions change relative to the Earth and the “sun.” This simulates the different moon phases.
6. Labeling and Detailing:
Step 12: Label each phase of the moon (New Moon, First Quarter, Full Moon, Last Quarter) on the respective balls.
Your enhanced moon phases working model with rotating option is now complete!
This interactive model provides a dynamic representation of how the moon’s appearance changes as it orbits the Earth.
It’s an engaging educational tool for learning about the different phases of the moon with an added element of interactivity.