
Creating a personal area network (PAN) working model with cardboard and color paper is a fun and creative way to understand how devices communicate wirelessly.
Here’s a step-by-step guide to building your PAN model:
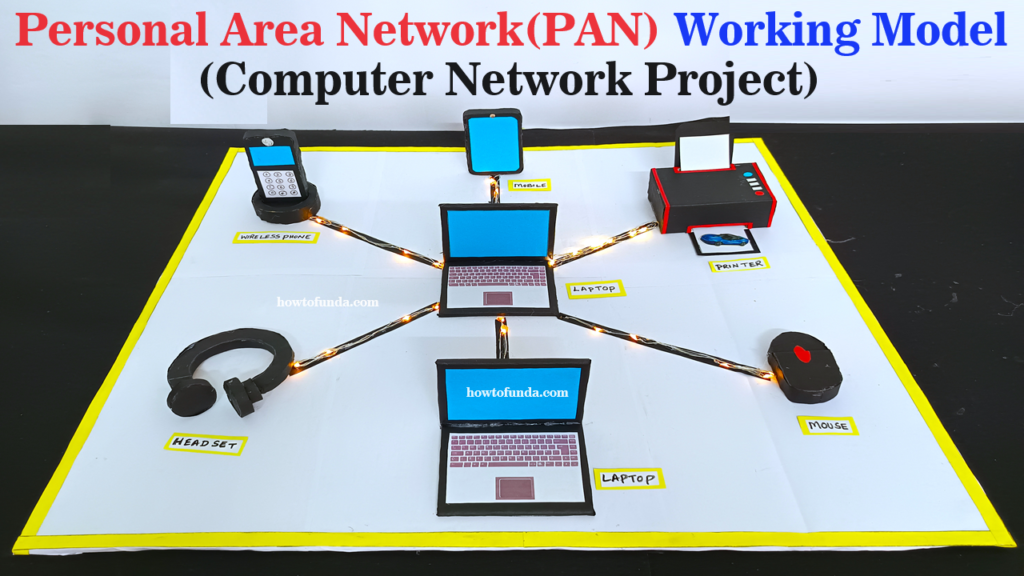
Materials Needed:
- Cardboard
- Color paper (various colors)
- Scissors
- Glue
- Markers
- LED lights
- Wires
- Batteries (for LED lights)
Devices to Represent:
- Laptop
- Desktop
- Printer
- Wireless phone
- Mobile
- Mouse
Step by Step Video Instructions:
- Prepare the Devices:
- Cut out shapes from cardboard to represent each device. For example, a rectangle for the laptop, a larger rectangle for the desktop, a square for the printer, a smaller rectangle for the wireless phone, a rectangular shape for the mobile, and a small oval for the mouse.
- Use color paper to cover each cardboard shape to represent the color of each device (e.g., black for the laptop, white for the desktop, gray for the printer, etc.).
- Write the name of each device on its respective shape.
- Create LED Lights for Network Representation:
- Attach LED lights to represent the network connections between devices.
- Cut out small circles from cardboard and color them to represent LED lights.
- Connect the LEDs with wires, leaving some length for connecting them to the devices.
- Use batteries to power the LEDs. Connect the positive (red) and negative (black) terminals of each LED with wires to the positive and negative terminals of the batteries.
- Connect the Devices:
- Arrange the devices on a flat surface in the desired configuration (e.g., laptop next to desktop, printer beside the desktop, wireless phone and mobile nearby, and the mouse near the laptop).
- Use color paper to create small arrows indicating the direction of data transfer between devices.
- Connect the LEDs with wires to show the network connections between the devices. For example:
- Connect the laptop to the desktop with an LED wire.
- Connect the desktop to the printer.
- Connect the wireless phone and mobile to the desktop.
- Connect the mouse to the laptop.
- Use different colors for each LED wire to represent different types of connections (e.g., blue for Bluetooth, green for Wi-Fi, etc.).
- Test the Model:
- Ensure all LEDs are connected properly and are lighting up.
- Move the devices closer or farther apart to simulate the range of a PAN.
- Test the connections by pretending to transfer data between devices (e.g., printing a document from the laptop to the printer, sending a file from the mobile to the desktop, etc.).
- Display and Explanation:
- Once the model is complete and tested, display it in the classroom or at home.
- Provide an explanation of each device and its role in the PAN, as well as how they communicate wirelessly using different technologies like Wi-Fi, Bluetooth, etc.
This model will not only help in understanding the concept of a PAN but also make learning fun and engaging!