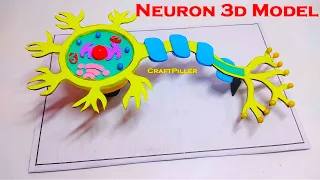
In this blog post we show you how to make the neuron model making(3D) for biology subject at home easily using cardboard and color paper

Creating a neuron model using cardboard and color paper is an excellent way to understand the basic structure and function of a neuron, which is a specialized cell that transmits electrical signals in the nervous system.
Here’s a step-by-step guide to making the model:
Materials you will need:
- Cardboard (for the base and neuron structures)
- Color paper (different colors for different parts of the neuron)
- Scissors
- Glue or adhesive
- Markers or pens (for adding details)
Step-by-step instructions:
- Prepare the base:
- Take a large piece of cardboard to serve as the base for your neuron model.
- Draw and cut out the cell body:
- Use color paper to cut out an oval shape representing the cell body (soma) of the neuron.
- Glue the cell body onto the cardboard base to represent the main part of the neuron.
- Add the dendrites:
- Use color paper to cut out several smaller, branched shapes representing dendrites.
- Glue the dendrites onto the cell body, extending outward like tree branches.
- Create the axon:
- Use color paper to cut out a long, thin shape representing the axon of the neuron.
- Glue the axon onto the cell body, extending in the opposite direction of the dendrites.
- Add the axon terminal:
- Use color paper to cut out a small, rounded shape representing the axon terminal.
- Glue the axon terminal at the end of the axon.
- Optional: Add myelin sheath:
- If you want to represent a myelinated neuron, use color paper to cut out thin strips to wrap around the axon, representing the myelin sheath.
- Glue the myelin strips onto the axon.
- Optional: Add synapses:
- Use color paper to cut out small dots or circles representing synapses, which are the connections between neurons.
- Glue the synapses on the ends of the dendrites and axon terminal to show where the neuron communicates with other neurons.
- Optional: Add labels and explanations:
- Use markers or pens to label the different parts of the neuron (cell body, dendrites, axon, axon terminal, myelin sheath, synapses, etc.).
- Include brief explanations of each part and its function in the neuron.
This model provides a visual representation of the basic structure and components of a neuron. It’s a fun and educational project to understand the role of neurons in transmitting electrical signals in the nervous system.
#neuronmodel #biologymodel #craftpiller #zoologymodel #scienceproject #scienceexhibition #sciencemodel