
The neuron is the fundamental building block of the nervous system, serving as the functional unit for transmitting information within the body.
It plays a critical role in processing and transmitting signals, allowing for communication between different parts of the body, including the brain, spinal cord, and peripheral organs.
Here’s an introduction to the structure of a neuron:
- Cell Body (Soma):
- The cell body is the central part of the neuron, often round or oval in shape. It contains the nucleus, which houses the genetic material (DNA) that governs the cell’s functions. The cell body integrates incoming signals from dendrites and, based on this input, decides whether to generate and transmit a signal of its own.
- Dendrites:
- Dendrites are branch-like extensions that radiate out from the cell body. They receive signals from other neurons or sensory receptors and transmit these signals toward the cell body. Dendrites play a crucial role in integrating information and relaying it to the cell body for processing.
- Axon:
- The axon is a long, slender projection extending from the cell body. It carries electrical impulses away from the cell body toward other neurons, muscles, or glands. Axons can be quite long, and they are insulated by a fatty substance called myelin, which enhances signal transmission speed.
- Axon Hillock:
- The axon hillock is a specialized region at the base of the axon where the electrical impulses (action potentials) are initiated. It acts as a threshold for determining whether an impulse will be generated and propagated down the axon.
- Myelin Sheath:
- In some neurons, the axon is wrapped in a protective layer of myelin, which is produced by specialized glial cells. This fatty substance insulates the axon, allowing for faster transmission of electrical signals.
- Nodes of Ranvier:
- In myelinated axons, small gaps called Nodes of Ranvier occur between adjacent segments of myelin. These nodes allow for the more efficient propagation of action potentials by enabling saltatory conduction (jumping from node to node).
- Terminal Buttons (Axon Terminals):
- At the end of the axon, terminal buttons are small, bulb-like structures. They contain synaptic vesicles filled with neurotransmitters. When an action potential reaches the terminal buttons, it triggers the release of neurotransmitters into the synaptic cleft.
- Synapse:
- A synapse is a tiny gap or junction between the terminal buttons of one neuron and the dendrites or cell body of another neuron. It is here that neurotransmitters are released, allowing for communication between neurons.
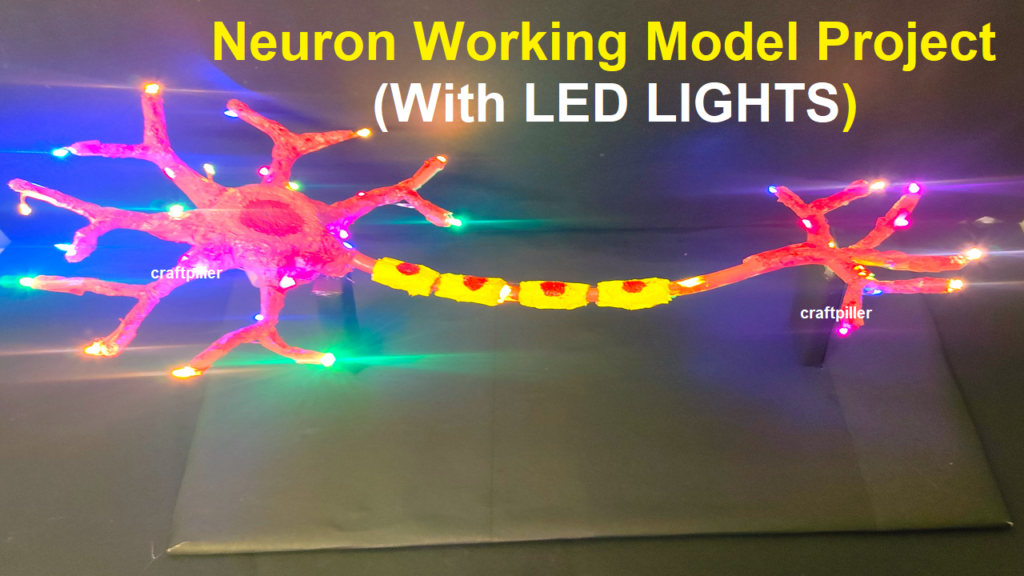
Below are step-by-step instructions to help you build it:
Materials Needed:
- GI Wire (for the structure)
- Tissue Paper (for the neuron’s cell body and dendrites)
- Paint (to color the cell body)
- LED Lights (to represent electrical impulses)
- Adhesive (to stick the components together)
- Transparent Pipe (for the axon)
- Cardboard or Base (to mount the model)
Steps:
- Prepare the Base:
- Take a piece of cardboard or a sturdy base to mount your neuron model. This will provide stability and support for the structure.
- Construct the Cell Body:
- Shape the GI wire into a circular or oval form to represent the cell body of the neuron. This will be the central part where the dendrites converge.
- Create Dendrites:
- Cut strips of tissue paper and twist them to form branches. Attach these branches to the cell body using adhesive. Dendrites are responsible for receiving signals from other neurons.
- Color the Cell Body:
- Paint the cell body to represent the nucleus and other cellular components. Neuron cell bodies are typically grayish in color.
- Attach LED Lights:
- Use small LED lights to represent electrical impulses. Attach them to the ends of some dendrites using adhesive. These LEDs will light up to simulate the transmission of signals.
- Create the Axon:
- Take the transparent pipe and bend it to form the axon. The axon is a long, slender extension that transmits electrical signals away from the cell body.
- Connect the Axon to the Cell Body:
- Attach one end of the transparent pipe to the cell body using adhesive. This simulates the connection between the axon hillock and the cell body.
- Add Terminal Buttons:
- At the end of the axon (farthest from the cell body), create small bulges using tissue paper to represent terminal buttons. These are responsible for transmitting signals to the next neuron.
- Secure Components:
- Ensure all components are securely attached. Use adhesive as needed to reinforce connections.
- Test the Model:
- Connect the LED lights to a power source to test the functionality of the model. When power is applied, the LEDs should light up to simulate the transmission of signals.
- Label the Parts (Optional):
- If desired, you can add labels to different parts of the neuron (e.g., cell body, dendrites, axon, terminal buttons) for educational purposes.