In this article we have given the detailed steps on how to make the maths TLM working model (parts of circles) – diy using cardboard at home
Creating a mathematics TLM circles quiz model using LED lights, a battery, and nails is a unique and hands-on way to make learning math concepts engaging.
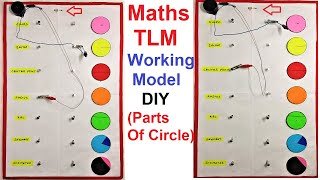
In this model, we’ll use LED lights to represent multiple-choice options for quiz questions and nails as answer selectors.
Here’s a step-by-step guide to making the quiz model:
Materials you will need:
- Cardboard or a sturdy base
- Colored paper or markers (for decoration)
- LED lights (different colors, one for each option)
- Nails (small )
- Wires and connectors
- 9V battery or AA/AAA batteries with battery holder
- Battery snap connector or terminal connector
- Hot glue gun or adhesive putty (for securing components)
Step-by-step instructions:
- Design the base:
- Cut a large piece of cardboard or use a sturdy base to serve as the foundation for your quiz model.
- Decorate the quiz board:
- Use colored paper or markers to decorate the cardboard base and make it visually appealing. You can add math-related symbols, equations, or designs.
- Attach the LED lights:
- Decide on the number of quiz options you want (e.g., four options for a multiple-choice question). Drill or cut holes on the quiz board where you want to place the LED lights.
- Insert the LED lights into the holes from the backside of the board so that the LED legs protrude through the front.
- Connect the LEDs:
- Connect the positive (longer) leg of each LED to the positive terminal of the battery snap connector using wires and connectors.
- Connect the negative (shorter) leg of each LED to its corresponding nail using wires and connectors.
- Attach the nails:
- Glue or tape the nails to the front side of the board, right below each LED. Each nail will represent one answer option for the quiz.
- Wire the nails:
- Connect the nails to the negative terminal of the battery snap connector using wires and connectors. These nails will act as the answer selectors.
- Optional: Add pushbuttons for a more responsive feel:
- If you prefer a more responsive feel for answer selection, you can add pushbuttons or tactile switches below each nail. Pressing the buttons will complete the circuit and activate the corresponding LED.
- Connect the battery:
- Connect the battery snap connector or terminal connector to the battery.
- Connect the positive and negative terminals of the battery to the corresponding terminals on the battery snap connector or terminal connector.
- Test the Quiz Model:
- Press the nails or pushbuttons to check if the corresponding LED lights up. The LEDs should illuminate when their respective nails or pushbuttons are pressed, simulating the answer selection in the quiz.
#mathstlm #workingmodel #circletypes #diy #howtofunda