In this video post we write about making of the hydraulic working model project using injection hydraulic projects – Car Lift for inspire award science project
#hydraulic #workingmodel #injection #hydraulicprojects #carlift #diypandit #diy #scienceproject #scienceexhibition #sciencefair #inspireaward #inspireawardproject

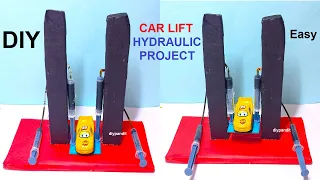
Creating a hydraulic working model using cardboard, syringes, a toy car, and color paper is a great way to demonstrate the principles of hydraulics and fluid power.
Here’s a step-by-step guide to help you build this model:
Materials Needed
- Cardboard sheets (for the base, structure, and components)
- Syringes (at least two, preferably larger ones)
- Plastic tubing or small diameter straws
- Toy car (small)
- Color paper or markers (for decoration)
- Hot glue gun or craft glue
- Scissors or craft knife
- Ruler
- Pencil
- Tape
- Small wooden dowels or sticks (optional, for reinforcement)
Step by Step guide on making of car lit hydraulic project working model
1. Prepare the Base and Structure
- Base Setup:
- Use a large piece of cardboard as the base for your model.
- Cut out a rectangular or square shape depending on the size you want for your model.
- Structure Setup:
- Cut and assemble pieces of cardboard to create a framework or platform that will support the syringes and the car.
- Use hot glue or craft glue to securely attach the pieces together.
- Ensure the structure is sturdy and can hold the weight of the syringes and the car.
2. Construct the Hydraulic System
- Syringe Placement:
- Attach the syringes to the structure using hot glue or tape. Place them side by side or in a row depending on your design.
- Ensure the syringes are positioned vertically and securely attached to prevent leaks.
- Connect Syringes with Tubing:
- Use plastic tubing or small diameter straws to connect the syringes. Cut the tubing to the appropriate lengths.
- Attach one end of the tubing to the nozzle of each syringe. Secure it with hot glue or tape to prevent leaks.
- Attach to the Car:
- Attach the other end of the tubing to the underside of the toy car. You may need to use hot glue or tape to secure the tubing to the car’s chassis.
- Ensure the tubing is positioned in a way that allows it to push or pull the car when the syringes are operated.
3. Decorate and Finalize
- Decoration:
- Use color paper, markers, or paints to decorate the cardboard base and structure. Add details such as roads, scenery, or labels for the syringes.
- Testing and Operation:
- Fill each syringe with water or colored liquid (for visibility).
- Operate the syringes by pushing or pulling the plungers. Observe how the fluid pressure in one syringe moves the car by pushing fluid into the other syringe.
By following these steps, you’ll create an engaging and educational hydraulic working model using cardboard, syringes, a toy car, and color paper.