
In this article we write on how to make the human respiratory system working model (lungs) simple for science fair or exhibition
This simple model effectively demonstrates the basic mechanics of breathing and the role of the diaphragm in the respiratory system.
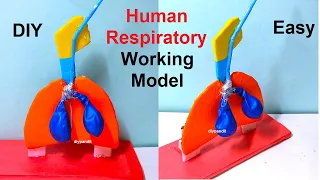
Creating a working model of the respiratory system using balloons, straws, and cardboard is a great hands-on way to understand how the lungs function.
Here’s a step-by-step guide to building this model:
Materials Needed:
- 1 large balloon (to represent the diaphragm)
- 2 small balloons (to represent the lungs)
- 1 large plastic bottle (clear if possible)
- 2 straws
- Cardboard
- Tape
- Scissors or a craft knife
- Glue (optional)
Step by Step Video Instructions:
- Prepare the Bottle:
- Cut the bottom off the large plastic bottle. This will be the main body of the model, representing the chest cavity.
- Make the Lung Assembly:
- Take the two straws and join them at one end with tape to form a “Y” shape. The single end will act as the trachea, and the split ends will act as the bronchi.
- Attach a small balloon to the end of each straw leg. Secure them with tape. These balloons represent the lungs.
- Insert the Lung Assembly:
- Insert the “Y” end of the straw assembly into the bottle’s neck. Seal around the neck with tape to ensure no air escapes.
- The balloons should hang inside the bottle, and the straw should stick out from the top.
- Prepare the Diaphragm:
- Take the large balloon and cut off its neck (the narrow part). Stretch the remaining part of the balloon over the open bottom of the bottle. This balloon represents the diaphragm.
- Secure it tightly with tape, ensuring it is airtight.
- Create the Chest Plate (optional):
- Cut a piece of cardboard to fit over the front of the bottle, with a hole at the top for the straw to pass through. This piece will act as the ribcage.
- Seal and Finish:
- Ensure all connections are airtight. Use extra tape where necessary.
- Optionally, you can glue the cardboard chest plate to the front of the bottle.
Demonstration:
- Simulating Breathing:
- To demonstrate inhalation, pull the large balloon (diaphragm) down gently. This increases the volume inside the bottle (chest cavity), reducing the pressure and causing the small balloons (lungs) to inflate as air is drawn in through the straws (trachea and bronchi).
- To demonstrate exhalation, push the large balloon (diaphragm) up gently. This decreases the volume inside the bottle, increasing the pressure and causing the small balloons (lungs) to deflate as air is expelled.
Explanation:
- Inhalation: When the diaphragm contracts and moves downward, the chest cavity volume increases, leading to a decrease in pressure inside the lungs. Air from outside, where the pressure is higher, rushes into the lungs to equalize the pressure.
- Exhalation: When the diaphragm relaxes and moves upward, the chest cavity volume decreases, leading to an increase in pressure inside the lungs. Air from the lungs is expelled out to equalize the pressure.
#humanrespiratorysystem #workingmodel #scienceproject #biologyproject #scienceexhibition #sciencefair #swasantantra