
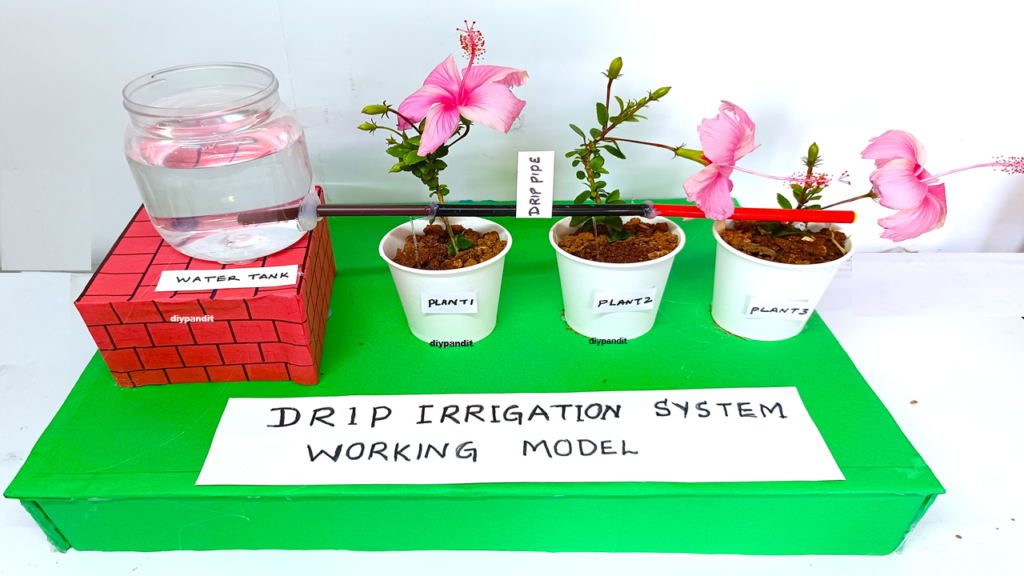
Objective
To create a working model of a drip irrigation system using readily available materials such as a plastic bottle, cardboard, old sketch pens, paper cups, and a cardboard box.
Materials Needed
- Plastic bottle (to act as the water tank)
- Cardboard box (to hold the water tank and plants)
- Old sketch pens (to be used as delivery drip pipes)
- Paper cups (to represent plants)
- Cardboard (for structural support and piping layout)
- Scissors or craft knife
- Glue gun or strong adhesive
- Tape
- Marker
- Pin or needle (to make small holes in the drip pipes)
- Water
Step by Step Video Instructions
Step 1: Prepare the Base and Structure
- Prepare the Cardboard Box:
- Use a cardboard box to act as the base for your model. This box will hold the water bottle and the paper cups (plants).
- Ensure the box is sturdy and large enough to fit the water bottle and at least 4-5 paper cups.
- Create Plant Holders:
- Cut holes in the bottom of the cardboard box to fit the paper cups. These holes will hold the cups upright.
- Place the paper cups into these holes. These cups will act as your plant holders.
Step 2: Prepare the Water Tank
- Prepare the Plastic Bottle:
- Clean the plastic bottle thoroughly.
- Make a small hole near the bottom of the bottle. This hole will be used to insert the main water delivery pipe.
- Attach the Main Delivery Pipe:
- Take one of the old sketch pens and remove the inner ink tube, leaving just the outer plastic shell.
- Insert this empty sketch pen shell into the hole you made in the plastic bottle. Seal it tightly with glue or tape to prevent leaks.
Step 3: Create the Drip Pipes
- Prepare the Drip Pipes:
- Take additional old sketch pens and remove the ink tubes, leaving only the plastic shells.
- Use a pin or needle to make small holes along the length of these plastic shells. These holes will act as the drippers.
- Attach the Drip Pipes:
- Cut a piece of cardboard to act as a platform to hold the drip pipes above the paper cups.
- Arrange the sketch pens (drip pipes) on this platform so that each pipe aligns with a paper cup below.
- Connect the main delivery pipe (from the plastic bottle) to these drip pipes using pieces of tubing or directly with the sketch pen shells.
Step 4: Assemble the System
- Position the Water Tank:
- Place the plastic bottle on top of the cardboard box. Ensure it is securely positioned and elevated so gravity can help the water flow through the drip pipes.
- Connect the Drip Pipes:
- Arrange the drip pipes over the paper cups, ensuring the holes in the pipes are positioned directly above the cups.
- Secure the drip pipes to the cardboard platform using glue or tape.
Step 5: Testing the System
- Fill the Water Tank:
- Fill the plastic bottle with water and secure the cap. If the bottle has a valve, ensure it is closed until you are ready to test the system.
- Test the Drip Irrigation:
- Open the valve or remove the cap slightly to allow water to flow from the plastic bottle into the main delivery pipe.
- Observe the water flowing through the drip pipes and dripping into the paper cups.
- Adjustments:
- If the water flow is too fast or too slow, adjust the size and number of holes in the drip pipes.
- Ensure there are no leaks in the system and that each cup receives an adequate amount of water.
Conclusion
This working model of a drip irrigation system demonstrates the principles of efficient water usage in agriculture.
By constructing this model, students can understand how drip irrigation helps conserve water while ensuring that plants receive an adequate and consistent supply of moisture.