Good morning everyone.
Today I am going to explain my science project on “Smoke Generator Working Model.” This is a DIY working model that demonstrates how smoke can be generated using a simple heating and airflow mechanism. This project is useful for understanding concepts related to air pressure, heating, combustion, and smoke production.

The model is battery-powered and produces visible smoke using paper and controlled airflow. It is a creative and interesting project for science exhibitions and STEM learning activities.
Aim of the Project
The main aim of this project is:
- To demonstrate smoke generation
- To explain airflow and heating mechanisms
- To understand simple combustion concepts
- To create a working science model using simple materials
Explanation of the Model
The model consists of:
- A smoke chamber
- A small motor/fan
- Battery connection
- Smoke output pipe
- Fire input tube
- Switch system
When paper is lightly burned at one end, smoke enters the chamber. The motor pushes the smoke through the output pipe, creating a smoke effect.
Parts of the Smoke Generator
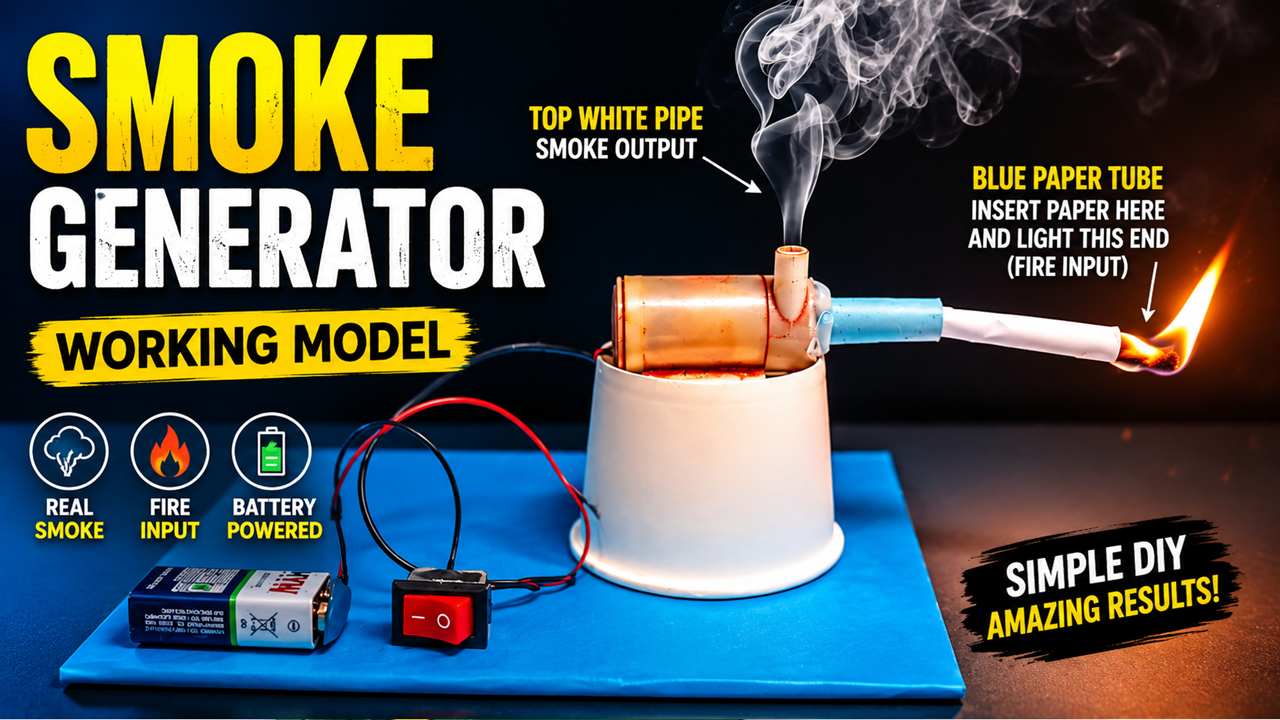
1. Fire Input Tube
The blue paper tube shown in the model is the fire input section.
A small piece of paper is inserted here and carefully ignited. The burning paper creates smoke.
This smoke travels inside the chamber.
2. Smoke Chamber
The central cylindrical section acts as the smoke storage chamber.
The chamber collects smoke generated from the burning paper and directs it toward the output pipe.
3. Small Motor or Fan
Inside the model, a small DC motor with a fan is used.
The fan:
- Pushes air inside the chamber
- Forces smoke to move forward
- Creates continuous smoke flow
This demonstrates airflow and pressure movement.
4. Smoke Output Pipe
The vertical white pipe at the top acts as the smoke outlet.
Smoke comes out from this pipe like a mini smoke machine or chimney.
5. Battery and Switch
The model is powered using a battery connected with wires and a switch.
The switch controls the motor operation.
When the switch is turned on:
- The fan rotates
- Air pressure pushes smoke out
Working of the Smoke Generator
The model works in simple steps:
Step 1 – Turn On the Switch
The battery powers the motor and fan.
Step 2 – Insert Paper
A small paper strip is inserted into the input tube.
Step 3 – Light the Paper
The paper is ignited carefully to create smoke.
Step 4 – Smoke Collection
The smoke enters the chamber.
Step 5 – Smoke Output
The fan pushes smoke through the output pipe.
This creates a continuous smoke effect.
Scientific Concepts Used
This project explains:
- Combustion
- Air pressure
- Airflow mechanism
- Heat energy
- Smoke movement
- Mechanical systems
Real-Life Applications
Smoke generation systems are used in:
- Stage performances
- Fire safety training
- Industrial testing
- Airflow experiments
- Special effects in movies
Smoke machines help visualize air movement and effects.
Materials Used
This DIY project is made using:
- Cardboard or plastic tubes
- Small DC motor
- Fan blade
- Battery
- Switch
- Wires
- Glue gun
- Paper cups or cylindrical containers
How to Make the Model
Step 1 – Prepare the Base
Take a cardboard base and fix a paper cup or chamber.
Step 2 – Install the Motor
Attach a small motor with a fan inside the chamber.
Step 3 – Create Pipes
Fix one pipe for smoke input and another for smoke output.
Step 4 – Connect Battery and Switch
Connect the motor using wires, battery, and switch.
Step 5 – Test the Smoke Flow
Insert burning paper carefully and observe smoke movement.
Safety Precautions
While performing this experiment:
- Use very small paper pieces
- Handle fire carefully
- Perform under adult supervision
- Keep water nearby
- Avoid touching heated parts
Safety is very important during fire-related experiments.
Advantages of the Project
- Easy DIY science project
- Demonstrates practical science concepts
- Low-cost and creative
- Attractive for exhibitions
- Helps understand airflow systems
Educational Importance
This project helps students:
- Learn combustion concepts
- Understand airflow and pressure
- Improve practical science skills
- Develop creativity and innovation
Conclusion
In conclusion, this Smoke Generator Working Model is a simple and creative science project that demonstrates smoke production using airflow and heating principles.
The model explains important concepts such as combustion, air pressure, and mechanical airflow systems in an interesting way. It is highly suitable for school science exhibitions and STEM learning activities.