
Introduction
The Food Pyramid 3D Model is an educational science project that explains the importance of a balanced diet by organizing different food groups into pyramid-shaped layers. The foods at the bottom should be eaten more frequently, while those at the top should be consumed in smaller amounts. This model helps students understand healthy eating habits, proper nutrition, and the role of different food groups in maintaining good health.
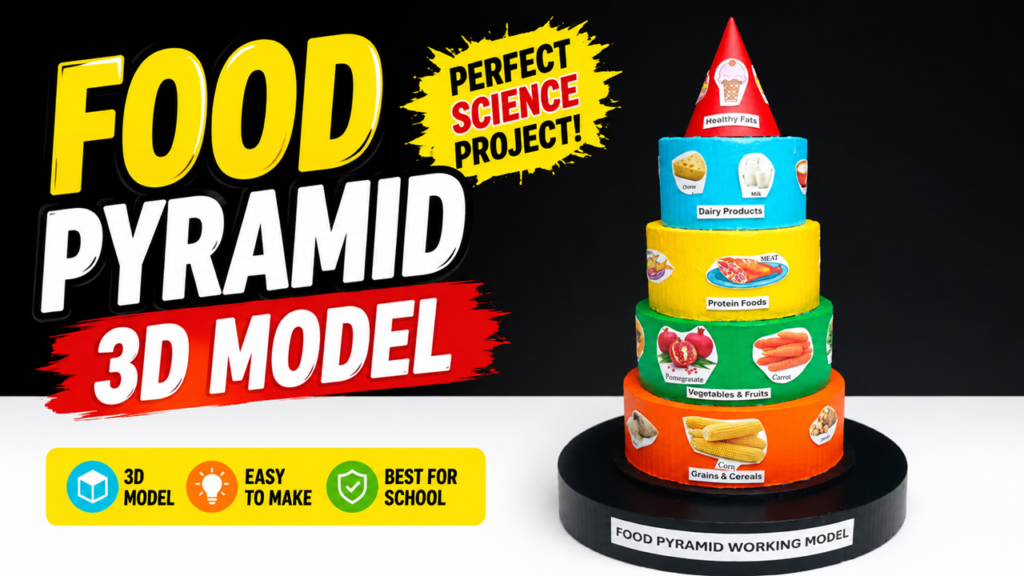
It is an excellent project for school science exhibitions, health awareness programs, and nutrition education.
Aim
To demonstrate the Food Pyramid and explain the importance of a balanced diet through a colorful 3D working model.
Objective
- To understand the different food groups.
- To explain the Food Pyramid structure.
- To promote healthy eating habits.
- To demonstrate the importance of a balanced diet.
Materials Required
- Thick cardboard or foam board (Base)
- Cardboard sheets
- Colored chart papers (Orange, Green, Yellow, Blue, Red)
- Five circular cardboard discs (different sizes)
- Cardboard cone (Top)
- Printed food pictures or magazine cut-outs
- Black chart paper (Base covering)
- Hot glue gun
- Fevicol
- Double-sided tape
- Cutter
- Compass
- Scale
- Acrylic paints (Optional)
- Marker pen
- Labels for food groups
Theory
The Food Pyramid is a guide that shows how much of each type of food should be eaten every day to maintain a healthy body.
Foods at the bottom should be eaten in larger quantities because they provide energy.
Foods at the top should be eaten sparingly because they contain high amounts of fats and oils.
Eating from all food groups in the right proportion helps maintain good health, supports growth, strengthens immunity, and prevents nutritional deficiencies.
Food Pyramid Levels
Level 1 – Grains and Cereals (Bottom Layer)
Examples:
- Rice
- Wheat
- Bread
- Chapati
- Corn
- Oats
- Millets
These foods provide carbohydrates, the body’s main source of energy.
Level 2 – Vegetables and Fruits
Examples:
- Carrot
- Spinach
- Tomato
- Apple
- Orange
- Banana
- Pomegranate
These foods are rich in vitamins, minerals, and dietary fiber.
Level 3 – Protein Foods
Examples:
- Eggs
- Fish
- Chicken
- Pulses
- Beans
- Nuts
- Soybeans
Proteins help build muscles and repair body tissues.
Level 4 – Dairy Products
Examples:
- Milk
- Cheese
- Yogurt
- Butter
Dairy foods provide calcium and vitamin D for strong bones and teeth.
Level 5 – Healthy Fats (Top Layer)
Examples:
- Olive Oil
- Nuts
- Seeds
- Avocado
Healthy fats should be consumed in small amounts as part of a balanced diet.
How to Make the Model
Step 1: Prepare the Base
- Cut a circular cardboard base.
- Cover it with black chart paper.
- Fix a name label at the front.
Step 2: Make the Pyramid
Create five circular cardboard cylinders of different diameters.
Arrange them from largest to smallest:
- Large Orange Cylinder
- Green Cylinder
- Yellow Cylinder
- Blue Cylinder
- Red Cone
Glue them one above another to form the pyramid.
Step 3: Cover with Colored Paper
Wrap each layer with colored chart paper.
Example:
- Orange → Grains & Cereals
- Green → Vegetables & Fruits
- Yellow → Protein Foods
- Blue → Dairy Products
- Red Cone → Healthy Fats
Step 4: Paste Food Pictures
Cut and paste pictures of foods belonging to each category.
Examples:
Grains
- Rice
- Wheat
- Corn
- Bread
Fruits & Vegetables
- Apple
- Carrot
- Banana
- Tomato
Proteins
- Fish
- Eggs
- Meat
- Beans
Dairy
- Milk
- Cheese
- Yogurt
Healthy Fats
- Nuts
- Seeds
- Olive Oil
Step 5: Add Labels
Attach labels for each layer:
- Healthy Fats
- Dairy Products
- Protein Foods
- Vegetables & Fruits
- Grains & Cereals
Step 6: Final Decoration
- Add a title label.
- Decorate the base neatly.
- Ensure all food pictures are clearly visible.
Working
The Food Pyramid model explains healthy eating by showing the recommended proportion of different food groups.
- The bottom layer contains grains and cereals, which should form the largest part of our daily diet as they provide energy.
- The second layer includes fruits and vegetables that supply essential vitamins, minerals, and fiber.
- The third layer represents protein-rich foods needed for growth and tissue repair.
- The fourth layer contains dairy products, which help build strong bones and teeth.
- The top layer includes healthy fats, which should be consumed in small quantities.
During the exhibition, students can explain how eating foods from every level in the right proportion helps maintain a balanced diet and promotes good health.
Scientific Concept
A balanced diet provides all the essential nutrients required by the body in the correct proportions.
The six major nutrients are:
- Carbohydrates
- Proteins
- Fats
- Vitamins
- Minerals
- Water
A balanced diet supports:
- Growth and development
- Energy production
- Strong bones
- Healthy muscles
- Disease prevention
- Better immunity
Advantages
- Easy to understand.
- Attractive 3D model.
- Promotes healthy eating habits.
- Low-cost science project.
- Suitable for all age groups.
- Reusable for classroom teaching.
Conclusion
The Food Pyramid 3D Model is a simple, colorful, and informative science project that teaches the importance of balanced nutrition and healthy eating habits.
By organizing foods into different layers based on their nutritional value and recommended intake, the model helps students understand how to make healthier food choices. It is an ideal project for school science exhibitions, combining creativity with practical knowledge about nutrition and overall well-being.