The model helps demonstrate the basic principles of how dialysis removes waste products and excess fluids from the blood.
It emphasizes the importance of the permeable membrane in allowing selective passage of substances.
Observing the change in fluid color illustrates the effectiveness of dialysis in cleansing the blood.
While this model simplifies the complex process of medical dialysis, it serves as a visual and hands-on tool to enhance understanding of the fundamental principles involved in this life-saving medical procedure.
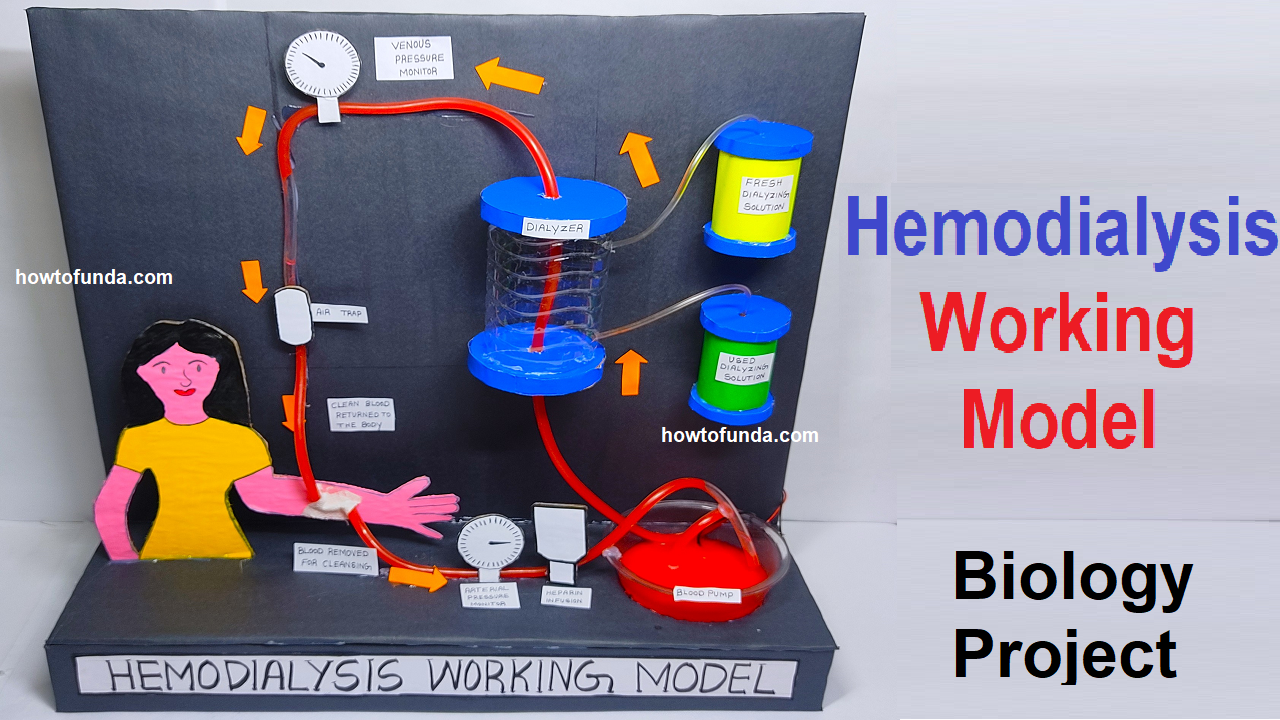
working model on hemodialysis making
Creating a working model to demonstrate hemodialysis for a biology project involves simplifying the complex process while highlighting key components.
Below is a guide for building a basic hemodialysis working model:

Materials Needed:
- Representing the body using the cardboard
- Clear plastic tubing
- Sponge or foam
- Red-colored water (representing blood)
- Blue-colored water (representing dialysate)
- Plastic tubing connectors
- Plastic funnel
- Clamps or clips for tubing control
- Syringe
- Plastic sheet or tray (to catch excess water)
- Labels and markers
hemodialysis working model making steps
1. Prepare the Container:
- Use a large plastic container to represent the body. This will hold the “blood” (red-colored water) and simulate the circulatory system.
2. Create Blood Circuit:
- Connect clear plastic tubing to represent blood vessels. Place a sponge or foam at one end to simulate the “blood” entering and leaving the body.
3. Design Dialysis Chamber:
- Use a plastic funnel as the dialysis chamber. Connect it to the blood circuit with plastic tubing. This chamber allows the exchange of substances between blood and dialysate.
4. Simulate Dialysate Flow:
- Use a separate circuit of clear tubing to represent the dialysate pathway. Connect it to the dialysis chamber. Fill this tubing with blue-colored water to represent the dialysate.
5. Control Flow with Clamps:
- Use clamps or clips on the tubing to control the flow of both blood and dialysate. This simulates the control of fluid movement in a real hemodialysis system.
6. Demonstrate Filtration:
- Use a syringe to draw out some “blood” from the blood circuit and introduce it into the dialysis chamber. Allow the simulated filtration process to occur.
7. Observe Filtrate:
- Observe the change in color of the dialysate (blue-colored water) to demonstrate the removal of waste products.
8. Collect Filtrate:
- Allow the “cleaned” dialysate to flow into a separate container or tray, simulating the collection of purified blood.
9. Label Components:
- Attach labels to various components, such as blood vessels, dialysis chamber, and tubing, to explain each part’s role in the hemodialysis process.
10. Presentation:
- During your presentation, explain the purpose of hemodialysis, the role of the dialysis chamber, and how waste products are removed from the blood through the exchange with dialysate.
Presentation Ideas:
- Explain Dialysis Principles:
- Discuss the principles of hemodialysis, emphasizing the removal of waste products and excess fluids from the blood.
- Discuss the Importance of Hemodialysis:
- Explain why hemodialysis is necessary for individuals with kidney failure and how it helps maintain a balance of electrolytes in the body.
- Highlight Real-World Applications:
- Discuss how hemodialysis is used as a life-saving medical procedure and its impact on patients with renal issues.
- Interactive Session:
- Encourage questions and interaction from your audience during the presentation to ensure a clear understanding of the hemodialysis process.