In this blog post i will tell you how to make the day and night working model for science exhibition project – diy at home easily
#dayandnight #workingmodel #workingproject #scienceexhibition #sciencefair #scienceproject #diy #diypandit

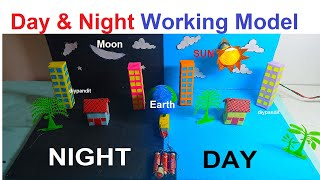
Creating a day and night working model using cardboard, a slow motor, LED bulbs for the sun and moon, and an Earth ball can be a fun and educational project.
Here’s a step-by-step guide to help you build it:
Materials Needed:
- Cardboard (for the base and structures)
- Earth ball (or styrofoam ball painted to represent the Earth)
- Slow motor (preferably with adjustable speed)
- LED bulbs (one for the sun and one for the moon)
- Cardstock or color paper (for decorating)
- Small switch (optional, for controlling the motor)
- 9V battery and battery connector
- Wires and connectors
- Hot glue gun or strong adhesive
- Scissors
- Craft knife (for cutting cardboard)
- Ruler
- Marker or pen
Step by step guide to make the day and night working model for science exhibition project – diy at home easily
1. Prepare the Base and Structures
- Base Preparation:
- Start with a large piece of cardboard as the base. This will serve as the foundation for your model.
- Create Earth Representation:
- Use an Earth ball (or styrofoam ball) to represent the Earth. Paint it with continents and oceans if necessary. Alternatively, you can print and glue a world map onto the ball.
- House and Apartments:
- Create cardboard structures to represent houses and apartments. These will be placed on the base to represent a city or town.
2. Mounting the Earth and Motor
- Mount the Earth:
- Drill a hole through the Earth ball and secure it onto the slow motor shaft. Ensure it is balanced and can rotate freely.
- Motor Placement:
- Mount the slow motor securely on the base cardboard. Position it in such a way that it can rotate the Earth ball smoothly.
3. Installing the Sun and Moon LEDs
- Sun and Moon Creation:
- Create representations of the sun and moon using LED bulbs. You can use yellow or orange for the sun and white or silver for the moon.
- Attach each LED bulb securely to the base cardboard, positioning them above the Earth ball at appropriate distances.
- Electrical Connections:
- Connect the LED bulbs to wires and then to a battery connector.
- Optionally, include a small switch in the circuit to control the motor and LED bulbs.
4. Testing and Adjustments
- Operate the Model:
- Connect the battery to the circuit and test the model.
- The slow motor should rotate the Earth ball, causing it to simulate the Earth’s rotation.
- Observe how the rotation of the Earth ball affects the positioning of the sun and moon LEDs, creating a day and night cycle.
- Fine-tuning:
- Adjust the speed of the motor to control the speed of the day and night cycle.
- Ensure that the LEDs are positioned correctly to simulate sunlight and moonlight falling on the Earth ball.
By following these steps, you can create an engaging and informative day and night working model using simple materials like cardboard, LED bulbs, and a slow motor.