In this video blog we write about making of computer working model making at home using waste materials
Creating a computer model using cardboard, color paper, LED lights, and a 9V battery can be a fun and educational project.
Here’s a step-by-step guide to making a simple computer model:
Materials you’ll need:
- Cardboard or thick cardstock (for the base and computer components)
- Colored paper (for decorating and adding details)
- Scissors
- Glue or adhesive tape
- LED lights (different colors, if available)
- 9V battery
- Electrical wires with alligator clips or soldering iron (to connect the LEDs to the battery)
- Markers or colored pens (optional, for additional details)
Step-by-step process:
- Prepare the base:
- Cut out a rectangular or square piece of cardboard or thick cardstock to serve as the base for your computer model. The size can vary depending on how detailed you want the model to be.
- Create the computer components:
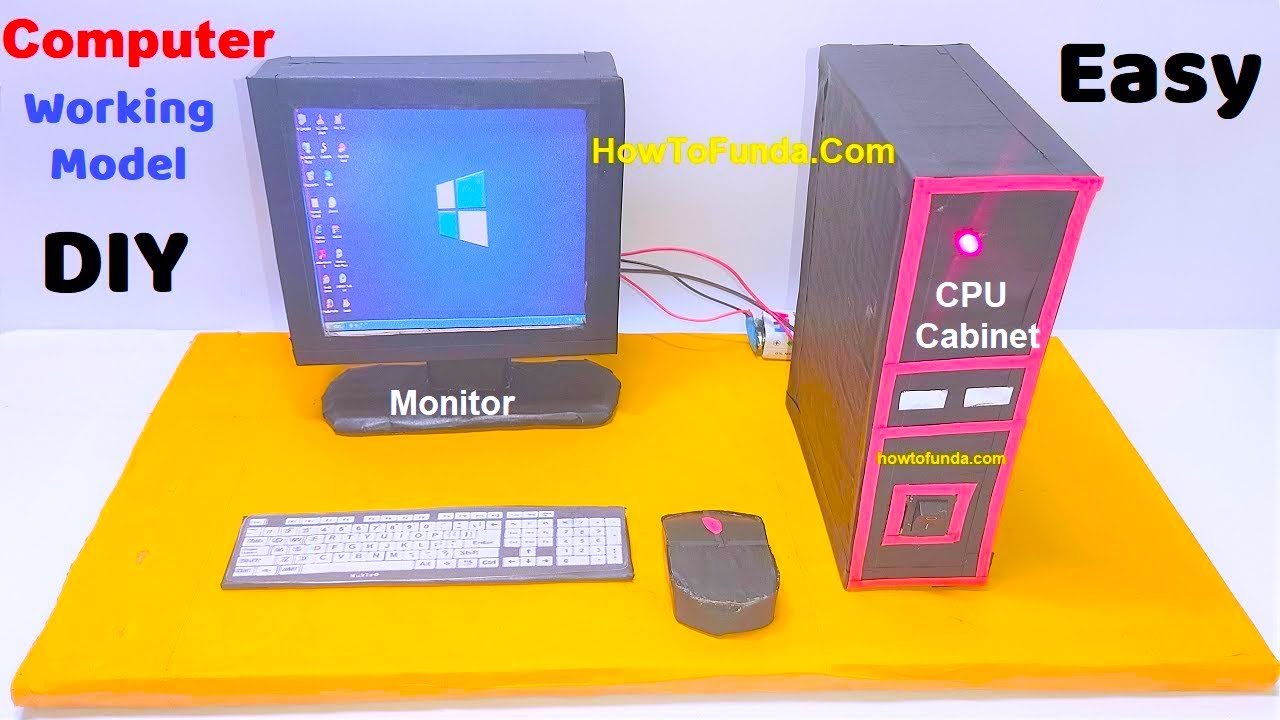
- Use colored paper to cut out shapes representing the main components of a computer, such as the monitor, keyboard, mouse, and CPU tower. You can use different colors to distinguish between the various parts.
- Use markers or colored pens to add additional details and labels to the computer components. For example, you can draw buttons on the keyboard, a screen on the monitor, and vents on the CPU tower.
- Glue or tape the paper cutouts representing each computer component onto the cardboard base. Arrange them to resemble the layout of a computer setup, with the monitor at the top, keyboard in the middle, and CPU tower at the bottom.
- Install the LEDs:
- For the monitor, cut out a rectangular shape representing the screen. On the backside, attach an LED light that emits the color of your choice. Connect the LED to the 9V battery using electrical wires and alligator clips or soldering iron.
- Connect the LEDs to the battery:
- Repeat the process of attaching LEDs to represent the power button and other indicator lights on the computer components. Connect each LED to the 9V battery using the appropriate wiring.
- Use colored paper and markers to add more details, such as the computer’s brand logo or additional buttons on the keyboard.
- Once your computer model is complete, you can use it as a visual aid to learn about the basic components of a computer and their functions. You can also discuss how electricity powers the LEDs, simulating the indicator lights on a real computer.
This simple model effectively demonstrates the basic components of a computer and helps learners understand their arrangement and functions.
#howto #makecomputer #usingcardboard #scienceproject #craftpiller #bestoutofwaste #westbest #computerdiy #cardboard #workingmodel #scienceexhibition #sciencemodel #sciencefair