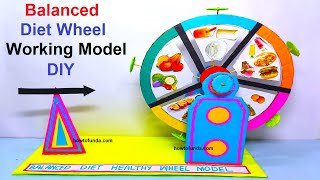
This article written on how to make the balanced diet working wheel model for healthy life science project
Creating a balanced diet working wheel using cardboard and color paper is a fun and interactive way to understand the concept of a balanced diet and the importance of including various food groups in our meals.
Here’s a step-by-step guide to making a basic balanced diet wheel:
Materials you will need:
- Cardboard (a circular shape, cut into a circle)
- Colorful construction paper or cardstock
- Scissors
- Glue or adhesive
- Marker or pen
- Brass fastener or paper fastener (split pin)
- Ruler (optional, for precision)
Step-by-step instructions:
- Prepare the cardboard base:
- Cut a circle out of the cardboard to use as the base for your balanced diet wheel. This will serve as the main body of the wheel.
- Divide the circle into segments:
- Using a marker or pen, divide the cardboard circle into six equal segments. These segments will represent the different food groups.
- Label the segments:
- On each segment, write the name of a food group. Common food groups to include are:
- Fruits
- Vegetables
- Grains (e.g., rice, bread, pasta)
- Proteins (e.g., meat, fish, beans, nuts)
- Dairy (e.g., milk, yogurt, cheese)
- Fats and oils (e.g., butter, olive oil)
- On each segment, write the name of a food group. Common food groups to include are:
- Prepare the color paper cutouts:
- Cut out small shapes from the color paper to represent different food items within each food group. For example, you can cut out fruits like apples and oranges, vegetables like carrots and broccoli, grains like bread slices, protein sources like fish and beans, dairy products like milk cartons, and fats and oils like a small bottle of olive oil.
- Glue the cutouts onto the corresponding segments:
- Glue the color paper cutouts onto their respective segments on the cardboard circle. Each segment should be filled with representative food items from the corresponding food group.
- Create an arrow pointer:
- Cut a small triangle out of color paper or cardstock. This will serve as the arrow pointer to indicate the current food group.
- Attach the arrow pointer to the center:
- Use a brass fastener or paper fastener (split pin) to attach the arrow pointer to the center of the cardboard circle. The fastener should go through the center of the arrow and the center of the circle, allowing the arrow to rotate.
- Optional: Decorate the wheel:
- If you wish, you can decorate the balanced diet wheel with additional color paper cutouts, drawings, or stickers.
This interactive model can be a great tool for teaching and learning about the importance of eating a variety of foods from different food groups to maintain a healthy and balanced diet.
By rotating the arrow pointer, you can highlight different food groups and encourage discussions about their nutritional benefits and how they contribute to overall well-being.
#balanceddiet #workingmodel #nutritionwheel #scienceproject #diy #dietwheel