
The Human Skeleton Model is an interesting and educational biology project that helps students learn about the structure of the human body.
The human skeleton provides support, protection, and movement to our body. This DIY model is easy to make using simple craft materials and is perfect for school science exhibitions, biology projects, and classroom demonstrations.
Materials Required
- Cardboard sheet or foam board
- White chart paper or white foam sheet
- Black chart paper (background)
- Pencil
- Scissors
- Glue or hot glue gun
- Marker pen
- Wooden toothpicks (optional for labels)
- Small paper labels
- Scale and ruler
Steps to Make the Human Skeleton Model
Step 1: Prepare the Background
Take a black chart paper or foam board and fix it onto a sturdy cardboard sheet. This will act as the background and make the white skeleton stand out clearly.
Step 2: Draw the Skeleton Parts
Using a pencil, draw the major bones of the human skeleton on white chart paper or foam sheet. Draw the skull, rib cage, spine, pelvis, arm bones, hand bones, leg bones, and feet separately.
Step 3: Cut the Bones
Carefully cut all the skeleton parts using scissors. Ensure that the edges are smooth and neat. You can slightly round the joints to make the model look realistic.
Step 4: Assemble the Skeleton
Arrange all the bones on the black background in the correct anatomical position. Start with the skull and spine, then attach the rib cage, pelvis, arms, and legs. Use glue to fix each part securely.
Step 5: Add Labels
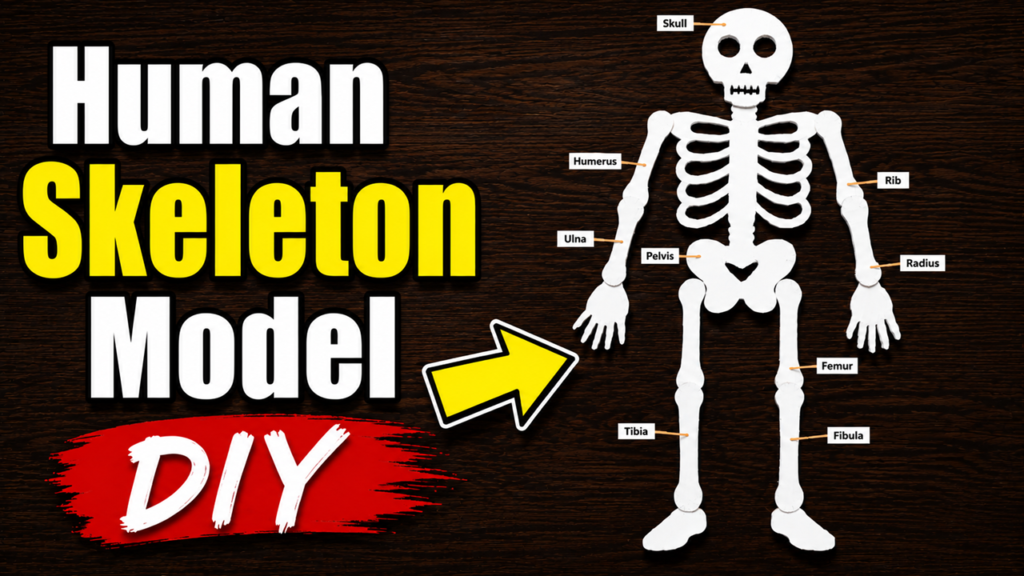
Prepare small labels for important bones such as Skull, Humerus, Radius, Ulna, Rib, Pelvis, Femur, Tibia, and Fibula. Attach the labels using small paper strips or toothpicks.
Step 6: Final Decoration
Check the alignment of all bones and make sure the skeleton looks proportional. Clean any extra glue marks and allow the model to dry completely.
Working and Explanation
The human skeleton is made up of 206 bones in an adult body. It forms the framework of the body and performs several important functions.
- Support: The skeleton gives shape and support to the body.
- Protection: Bones protect vital organs. For example, the skull protects the brain, and the rib cage protects the heart and lungs.
- Movement: Bones work together with muscles to help us move.
- Blood Cell Production: Bone marrow produces red and white blood cells.
- Mineral Storage: Bones store important minerals such as calcium and phosphorus.
The model demonstrates the arrangement of major bones and helps students understand how different parts of the skeleton are connected. It is a useful visual aid for learning human anatomy and body structure.
Conclusion
The Human Skeleton Model is a simple, low-cost, and informative science project. It helps students understand the skeletal system in an easy and practical way. This project is ideal for biology exhibitions, science fairs, and classroom presentations. By making this model, students can improve their creativity while learning important concepts about the human body.