
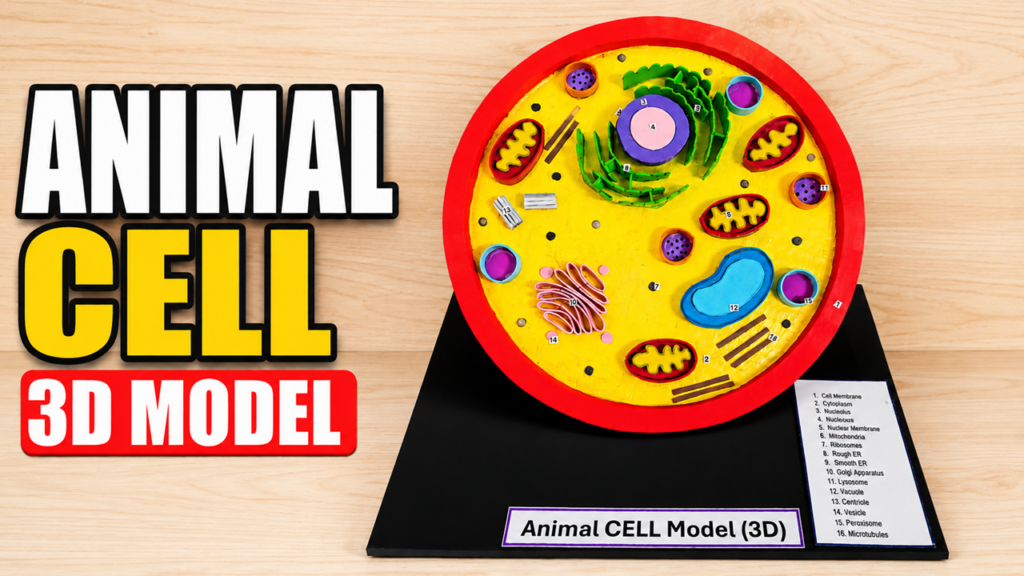
The Animal Cell 3D Model is an interesting biology project that helps students understand the structure and functions of different cell organelles.
Animal cells are the basic structural and functional units of animal life. Every organ in the body is made up of millions of cells that work together to perform various life processes.
This 3D model provides a visual representation of the internal parts of an animal cell and makes learning biology easier and more interactive.
This project is suitable for science exhibitions, biology fairs, and classroom demonstrations.
By creating a colorful three-dimensional model, students can easily identify organelles such as the nucleus, mitochondria, Golgi apparatus, endoplasmic reticulum, lysosomes, ribosomes, and vacuoles.
Materials Required
- Thick Cardboard or Foam Board (Base)
- Thermocol Sheet or Foam Sheet
- Colored EVA Foam Sheets or Color Paper
- Circular Plastic Plate/Cardboard Ring
- Acrylic Colors or Poster Colors
- Glue Gun / Fevicol
- Scissors and Cutter
- Sketch Pens or Markers
- Toothpicks for Labels
- White Paper for Organelles List
- Scale and Pencil
Parts Shown in the Model
- Cell Membrane
- Cytoplasm
- Nucleus
- Nucleolus
- Nuclear Membrane
- Mitochondria
- Ribosomes
- Rough Endoplasmic Reticulum (RER)
- Smooth Endoplasmic Reticulum (SER)
- Golgi Apparatus
- Lysosomes
- Vacuole
- Centriole
- Peroxisome
- Microtubules
Procedure
Step 1: Prepare the Base
Take a black cardboard or foam board and fix it as the project base. Place a circular ring or plate on the base to represent the animal cell boundary.
Step 2: Create the Cytoplasm
Cover the inside portion of the cell with yellow foam sheet or paint it yellow. This represents the cytoplasm where all organelles are suspended.
Step 3: Make the Nucleus
Create a large circular nucleus using colored foam sheets. Place a smaller circle inside it to represent the nucleolus. Fix it near the center of the cell.
Step 4: Add Mitochondria
Cut oval shapes from foam sheets and add zigzag patterns inside them. These represent mitochondria, the powerhouse of the cell.
Step 5: Add Endoplasmic Reticulum
Use curved strips of foam sheet around the nucleus to create rough and smooth endoplasmic reticulum.
Step 6: Create the Golgi Apparatus
Use curved stacked strips of foam sheets to form the Golgi apparatus.
Step 7: Add Other Organelles
Create lysosomes, ribosomes, vacuoles, centrioles, and peroxisomes using small colored foam pieces.
Step 8: Label the Parts
Number or label all organelles clearly. Add a chart listing the names of the cell organelles beside the model.
Working and Explanation
The animal cell is responsible for carrying out all life processes in animals. Each organelle performs a specific function:
- Cell Membrane: Controls movement of substances into and out of the cell.
- Cytoplasm: Jelly-like material where organelles are located.
- Nucleus: Controls all activities of the cell.
- Nucleolus: Produces ribosomes.
- Mitochondria: Generate energy through cellular respiration.
- Golgi Apparatus: Packages and transports proteins.
- Endoplasmic Reticulum: Helps in protein and lipid synthesis.
- Ribosomes: Produce proteins.
- Lysosomes: Digest waste materials and damaged cell parts.
- Vacuoles: Store water, nutrients, and waste products.
All these organelles work together to keep the cell alive and functioning properly.
Advantages of the Model
- Makes biology concepts easy to understand.
- Provides a clear view of cell organelles.
- Improves scientific learning through visualization.
- Useful for science exhibitions and classroom teaching.
- Enhances creativity and model-making skills.
Conclusion
The Animal Cell 3D Model is an excellent educational project that demonstrates the structure and functions of various cell organelles. It helps students understand how cells perform different activities necessary for life. This model is simple to build, visually attractive, and highly effective for science exhibitions, making it a great biology project for school students.