In this post we write about making of solar system working model – new design – innovative science project – diy | craftpiller
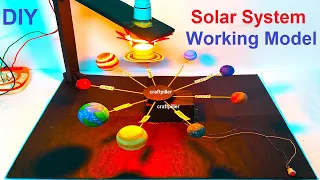
Creating a solar system working model with the sun represented by a light bulb at the top and planets below, connected by sticks to a slow-running motor, can be a fascinating way to understand the relative positions and movements of celestial bodies in our solar system.

Let’s build a simple 3D model to showcase this concept.
Materials needed:
- Cardboard (for the base and planet platforms)
- Color paper (for representing different planets)
- Light bulb (for the sun)
- Wooden sticks or dowels (for connecting planets)
- Slow-running motor (battery-operated)
- Glue or double-sided tape
- Scissors
- Marker pens or sketch pens
Step-by-step instructions:
- Base:
- Cut a large circular or rectangular piece of cardboard to serve as the base for the model.
- Sun:
- At the center from top to fix the light bulb using a bulb holder or any suitable means to represent the sun.
- Planet Platforms:
- Cut smaller circular pieces of cardboard to serve as platforms for each planet.
- Label each platform with the name of the respective planet.
- Planets:
- Use color paper to represent each planet.
- Cut out small circular shapes of varying sizes to represent the different planets in our solar system.
- Label each planet accordingly.
- Connecting Planets:
- Attach wooden sticks or dowels vertically to the backside of each planet platform.
- Ensure the sticks are long enough to connect the planets to the base.
- Slow-Running Motor:
- Position the slow-running motor on the base.
- Attach the other ends of the wooden sticks to the motor’s rotating shaft or any part that can cause movement.
- Make sure the motor is secure and stable on the base.
- Solar System Arrangement:
- Arrange the planets in their respective order from the sun, starting with Mercury and ending with Neptune or Pluto.
- Ensure the distances between the planets are approximately proportional to their actual distances from the sun.
- Labeling and Details:
- Use marker pens or sketch pens to label each planet and provide additional details about the solar system if desired.
- Powering the Motor:
- Connect the motor to a suitable power source (e.g., battery) to observe the slow rotation of the planets around the sun.
- Decorating the Model:
- Use markers or color paper to decorate the model and add more details to make it visually appealing.
Now, you have a solar system working model with the sun represented by a light bulb and planets rotating around it using a slow-running motor. This model can be a helpful visual aid to understand the relative positions and movements of planets in our solar system.
#solarsystem #workingmodel #newdesign #innovative #sciencemodel #scienceexhibition #sciencefair