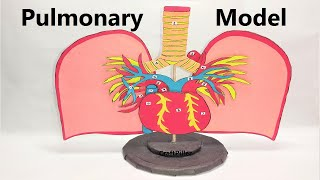
In this post we write about making of pulmonary model for science exhibition using cardboard and color paper
Creating a pulmonary model using cardboard, color paper, and thread can help illustrate the basic structure and function of the lungs.

Let’s build a simple 3D model that represents the pulmonary system.
Materials needed:
- Cardboard (for the base and structures)
- Color paper (for representing different elements)
- Woolen thread or thin string (for representing blood vessels)
- Scissors
- Glue or double-sided tape
- Marker pens or sketch pens
Step-by-step video instructions:
- Base:
- Cut a rectangular or square piece of cardboard to serve as the base for the model.
- Lungs:
- Use color paper to create the lung structures.
- Cut out two large oval or balloon-shaped pieces from color paper to represent the lungs.
- Trachea and Bronchi:
- Use woolen thread or string to represent the trachea and bronchi.
- Glue one end of the thread on top of one lung to represent the trachea.
- Divide the thread into two parts and attach each part to the bottom of each lung to represent the bronchi.
- Alveoli:
- Use smaller pieces of color paper to create the alveoli, which are the tiny air sacs in the lungs.
- Cut out many small, irregular shapes from the color paper and glue them inside the lungs to represent the alveoli.
- Blood Vessels:
- Use woolen thread or string of a different color to represent the blood vessels.
- Cut the thread into smaller pieces and glue them around the alveoli to represent the capillaries.
- Heart:
- Create a simple heart shape using color paper.
- Glue the heart to the base, and position it in a way that the blood vessels from the lungs lead to the heart.
- Labeling and Details:
- Use marker pens or sketch pens to label each part of the model, such as the trachea, bronchi, alveoli, and heart.
- You can also add arrows to indicate the flow of air and blood in the model.
- Decorating the Model:
- Use markers or color paper to decorate the model and add more details to make it visually appealing.
Now, you have a simple 3D pulmonary model made from cardboard, color paper, and thread. This model can be a helpful visual aid to understand the basic structure of the lungs, including the trachea, bronchi, alveoli, and their interaction with the heart through the blood vessels. It’s an interactive and creative way to explore the respiratory system and understand the essential role of the lungs in the process of breathing and gas exchange.
#pulmonarymodel #diy #craftpiller #scienceproject #scienceexhibition #sciencemodel #zoologymodel #biologymodel #sciencefair