INTRODUCTION
In this topic, we are going to show you how to make fertilization in plants model at home for your science project or exhibitions.
This fertilization in plants model is done using materials like cardboard, white papers and hot glue gun which is easily available at home at low cost.

What is fertilization in plants?
Plant fertilization is nothing the union of male and female reproductive cells (gametes) to produce a zygote (fertilized egg).
How does fertilization take place in plants?
Fertilization happens through a process called pollination. It occurs when pollen grains from another land on the stigma of the female flower.
What are the four stages of fertilization?
Four stages of fertilization are sperm preparation, sperm and egg binding, sperm-egg fusion and activation of the zygote.
The pistol is the fourth whorl of the flower. It constitutes the female reproductive part of the flower. The pistil consists of one or more female reproductive units called carpels. Each carpel contains three important parts – Ovary, style, and stigma.
Which part of the flower becomes the seed?
The Ovule which is fertilized becomes the seed and the ovary becomes the fruit
What is double fertilization in plants
Double fertilization is a type of fertilization which is complex in nature where the whole process involves in the joining of a female gametophyte with two male gametes.
How to make the model of Fertilization in plants at home step by step video?
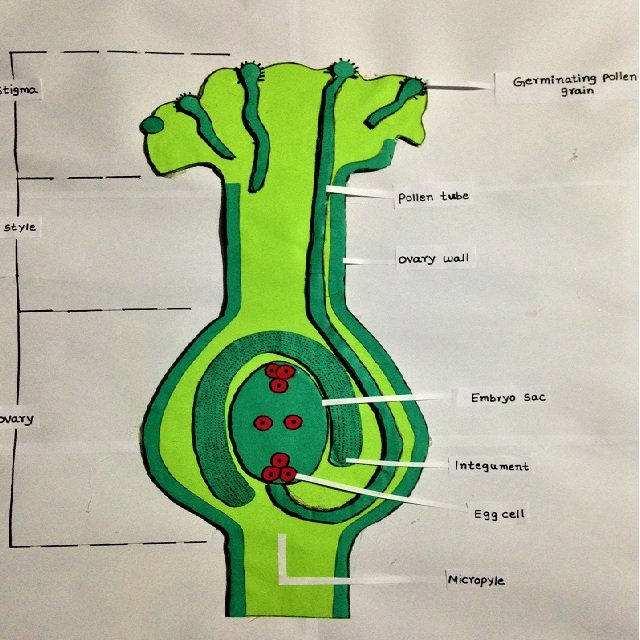
First, take rectangular shape cardboard and draw the central part of fertilization (Pistil) with the help of a pencil and cut it out.
Take a light green color paper and trace out pistil on to it and cut it. Similarly, create a replica of it on light blue color paper.
Next, take a central part of cardboard and paste light green color central part on top of it.
From the light blue color, paper creates the ovary wall. Use black sketch pen and trace the wall of the ovary.
Take small rectangular cardboard and draw the embryo sac and Integument.
With the help of these cardboard pieces, trace out embryo sac and Integument on light blue color paper.
Next paste both the tracked out paper on their respective cardboard pieces with the help of fevicol.
Take a long piece of cardboard and draw the pollen tube, cut it out. Trace it out on light blue color paper.
Next, paste traced paper on the cardboard with the help of fevicol. Next, create germinating pollen grains.
Take a large rectangular shaped cardboard with white paper and first stick the embryo sac at the center and connect the pollen tube to it which is having a pollen grain.
After that stick Integument on the upper side of the embryo sac. Now stick remaining pollen grains.
Paste the circular red color egg cells inside the embryo sac. Finally label all the parts namely style, stigma, ovary, germinating pollen grain, pollen tube, ovary wall, embryo sac, Integument, egg cell, and micropyle.
In this video, we will show steps by step video instructions on how to build fertilization in plants at home easy way.
Materials Used to make fertilization in plants
Materials used in this video are shown below to build fertilization in plants model at home by taking help of your parents.
- Cardboard
- Scale
- Pencil
- Waste box for cardboard
- Fevicol
- White papers
- Scissor
- Hot Glue gun
- Sketch Pen
Conclusions
Fertilization in the plant model helps students to learn about various parts of the flower and fertilization process and as well as how to make it with easily available materials at home.