In this post we write about making of the butterfly life cycle model using cardboard and color paper
Creating a butterfly life cycle model on a tree or plant using cardboard and color paper can be a fun and educational project.
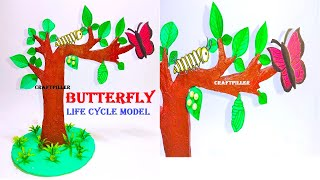
Let’s build a 3D model that represents the different stages of a butterfly’s life cycle.

Materials needed:
- Cardboard (for the base and tree structure)
- Color paper (for representing different elements)
- Scissors
- Glue or double-sided tape
- Marker pens or sketch pens
Step-by-step instructions:
- Base and Tree Structure:
- Cut a rectangular or square piece of cardboard to serve as the base for the model.
- Use additional pieces of cardboard to create a simple tree or plant structure on the base. You can cut out a trunk and branches from brown cardboard.
- Butterfly Eggs:
- Use color paper to represent butterfly eggs.
- Cut out small oval shapes from color paper to represent the butterfly eggs.
- Glue these egg shapes on a leaf or branch of the cardboard tree.
- Caterpillar:
- Use color paper to represent the caterpillar.
- Cut out a worm-like shape from green color paper to represent the caterpillar.
- Glue the caterpillar near the butterfly eggs to indicate that it hatches from the eggs.
- Chrysalis/Pupa:
- Use color paper to represent the chrysalis or pupa.
- Cut out a small teardrop or oval shape from color paper to represent the chrysalis.
- Glue the chrysalis on a branch or leaf of the cardboard tree.
- Butterfly:
- Use color paper to represent the butterfly.
- Cut out a butterfly shape from colorful color paper.
- Glue the butterfly near the chrysalis to show its emergence from the pupa.
- Labeling and Details:
- Use marker pens or sketch pens to label each stage of the butterfly’s life cycle, such as “Eggs,” “Caterpillar,” “Chrysalis,” and “Butterfly.”
- You can also add brief descriptions or interesting facts about each stage.
- Decorating the Model:
- Use markers or color paper to decorate the model and add more details to make it visually appealing.
- You can add leaves, flowers, and other decorative elements to enhance the tree or plant.
Now, you have a 3D butterfly life cycle model represented on a tree or plant using cardboard and color paper. This model can be a helpful visual aid to understand the different stages of a butterfly’s life, from eggs to caterpillar, pupa, and finally to a beautiful butterfly
#butterflylifecycle #modelmaking #craftpiller #scienceproject #scienceexhibition #biologymodel #zoologymodel