
An arm is a part of the human body that connects the hand to the shoulder. It is made up of bones, muscles, tendons, ligaments, and nerves. The bones of the arm include the humerus, the radius and ulna. The muscles of the arm are responsible for movement and include the biceps, triceps, and forearm muscles.
The biceps muscle is located at the front of the upper arm and is responsible for flexing the elbow and supinating the forearm. The triceps muscle is located at the back of the upper arm and is responsible for extending the elbow. The forearm muscles, which include the flexors and extensors, are responsible for flexing and extending the wrist and fingers.
The tendons and ligaments are connective tissues that connect the muscles and bones together and help to stabilize the joints. Nerves provide the control and sensation to the arm and hand.
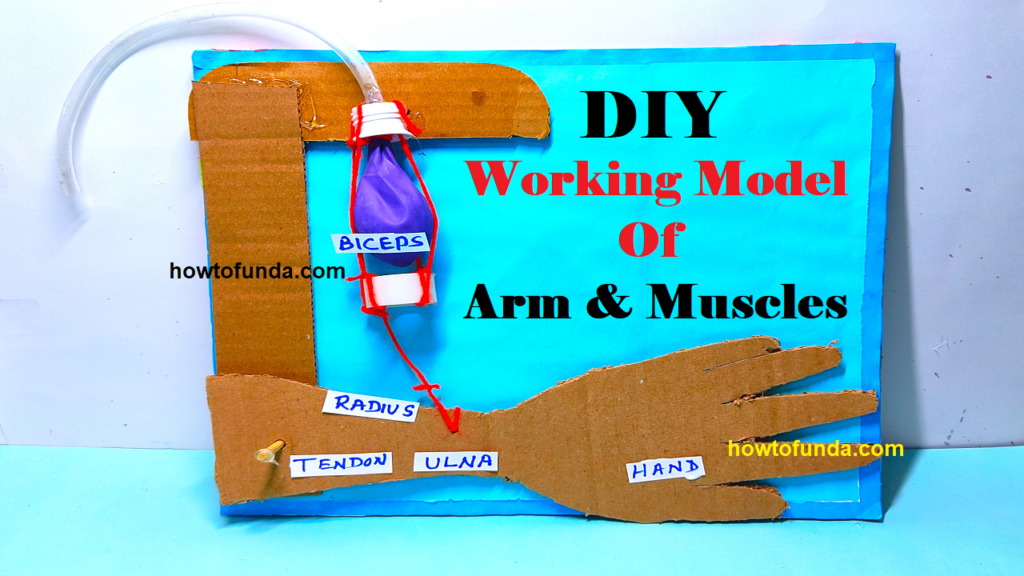
Making of Working Model of Arm and it Muscles
A working model of an arm and its muscles can be a great way to demonstrate the mechanics of human movement for a science project. Here is one way you can create such a model:
Materials:
- Cardboard or foam board
- Scissors or craft knife
- Glue or tape
- String or elastic bands
- Popsicle sticks or thin wooden dowels
- Styrofoam balls or small rubber balls or balloon
- Paint or markers (optional)
Instructions:
- Start by cutting out the basic shape of an arm from cardboard or foam board. You can use a picture of an arm as a reference.
- Cut out the shapes of the major muscles of the arm, such as the bicep, tricep, and forearm muscles, from cardboard or foam board and glue or tape them to the arm model.
- Use string or elastic bands to connect the different muscles to the bones of the arm. For example, you can attach one end of a string to the bicep muscle and the other end to the upper arm bone.
- Use popsicle sticks or thin wooden dowels to create the bones of the arm, such as the upper arm bone, the forearm bone, and the hand bones. Glue or tape the bones to the arm model.
- Use styrofoam balls or small rubber balls or balloon to represent the joints of the arm, such as the shoulder and elbow joints. Glue or tape them to the arm model.
- (Optional) paint or color the different parts of the arm and muscles to make them more realistic.
When using this model to demonstrate the mechanics of human movement, you can use the string or elastic bands to show how the muscles contract and relax to move the bones of the arm. You can also use the joints to show how different types of joints, such as ball and socket or hinge joints, allow for different types of movement.
#workingmodel #arm #muscles #sciencefair #scienceexhibition #scienceproject #biology #biologyproject #zoology #zoologyproject