
Creating a working model of a street light with a house using cardboard, colored paper, wires, LED lights, a 9V battery, and car toys is a great way to understand basic electrical circuits and lighting concepts.
Here’s a step-by-step guide on how to build this model:
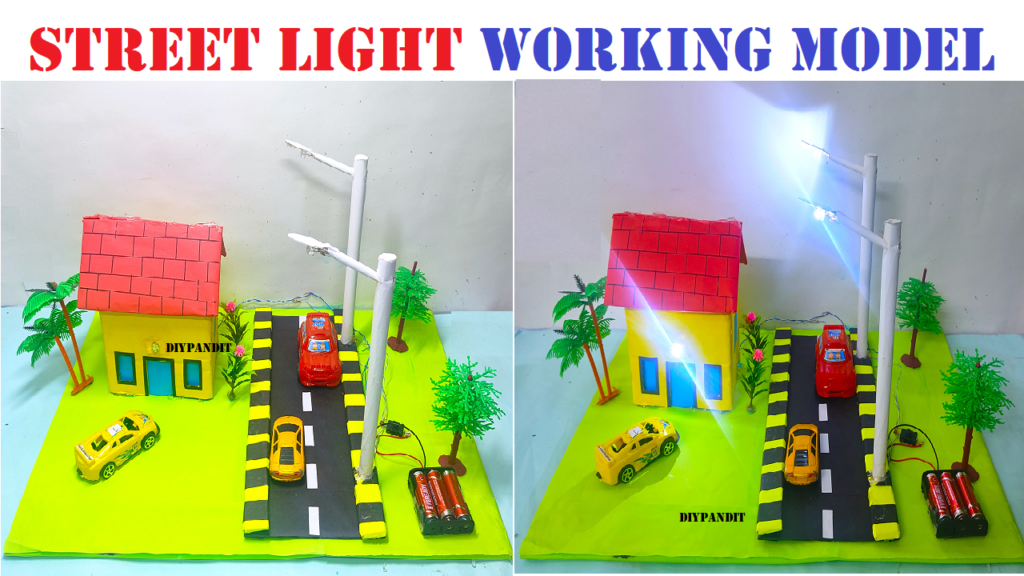
Materials You’ll Need:
- Cardboard sheets (for the base, house, and street light)
- Colored paper (for house and decorations)
- Craft knife or scissors
- LED lights (white for street light and yellow for house)
- 9V battery
- Wires with alligator clips or jumper wires
- Hot glue gun and glue sticks
- Small toy cars
- Craft supplies for decoration (markers, stickers, etc.)
Step by step video instructions on making of street light working model
- Prepare the Base:
- Cut a piece of cardboard to serve as the base for your model.
- You can paint or cover the base with colored paper to represent the road.
- Build the House:
- Cut and assemble cardboard pieces to create a simple house structure.
- Cover the house with colored paper to represent walls and a roof.
- House Windows and Door:
- Cut out windows and a door from colored paper and glue them onto the house.
- You can also draw details like curtains and plants on the windows.
- LED Lights for House:
- Attach yellow LED lights inside the house to represent interior lighting.
- Connect the LEDs in parallel to the 9V battery using wires and alligator clips.
- Street Light:
- Create a street light post using cardboard.
- Attach a white LED light to the top of the post to simulate the street light.
- Street Light Wiring:
- Connect the white LED to the 9V battery using wires and alligator clips.
- Ensure that the wires are securely connected to the battery and LED.
- Setting Up the Scene:
- Position the house and street light on the base, securing them with hot glue.
- Arrange small toy cars on the road to represent a street scene.
- Battery Placement:
- Position the 9V battery in a concealed area behind the model.
- You can use additional pieces of cardboard or colored paper to create a battery compartment.
- Switch Operation:
- You can add a simple switch using a small piece of cardboard and a paper fastener.
- Attach the switch to the battery circuit to turn the lights on and off.
- Final Touches:
- Decorate the model with additional details like trees, road signs, and other scenery elements using craft supplies.
This model will help you visualize how electrical circuits work and how simple components like LED lights, wires, and batteries can be used to create functioning lights for a miniature scene. It’s a creative way to learn about basic electronics and apply them to a fun and interactive project.
#streetlight #workingmodel #scienceproject #houselight #workingproject #diypandit