In this post we write about making of solar fencing for agriculture model in simple and easy
#solarfencing #agriculture #modelmaking #scienceproject #diy #diypandit #solarenergy #solarenergysystem #scienceexhibition #sciencefair #energy #renewableenergy #agriculture #agriculturemodel

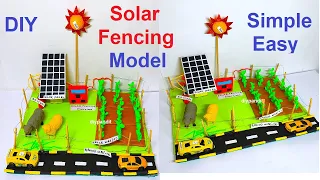
Creating a solar fencing model for agriculture using cardboard and color paper is an innovative way to demonstrate how solar-powered electric fences work to protect crops or livestock.
Here’s a step-by-step guide to making this model:
Materials Needed
- Cardboard
- Color paper (green for agriculture fields, brown for road, white for house)
- Scissors
- Glue or tape
- Markers or colored pencils
- Ruler
- Thread (for fencing)
- Small LED or bulb (optional, for representing electric current flow)
Step by Step Guide on making of solar fencing for agriculture model simple and easy
1. Prepare the Base and Background
- Base Setup:
- Cut a large piece of cardboard to serve as the base for your model.
- Use green color paper to cover part of the base to represent agriculture fields.
- Use brown color paper to create a road and white color paper to create a house.
2. Create the Solar Panel
- Solar Panel Setup:
- Cut out a rectangular piece of cardboard and cover it with aluminum foil to simulate solar cells.
- Attach small wires to the solar panel to connect to the electric fence (later step).
3. Construct the Electric Fence
- Fence Setup:
- Cut small strips of cardboard or use markers to create posts along the perimeter of the agriculture fields.
- Use thread to create horizontal lines between the posts, simulating the electric fence wires.
- Ensure the threads are taut and spaced evenly.
4. Add Functional Components
- House and Road:
- Use markers or colored pencils to add details to the house and road.
- Place the house and road in appropriate locations on the base.
- Solar Controller (Optional):
- Create a small box from cardboard to represent the solar controller.
- Label it accordingly and place it near the solar panel.
5. Wiring and Connections
- Connect Solar Panel to Fence:
- Use small pieces of wire to connect the solar panel to the electric fence threads.
- Ensure connections are secure and insulated with tape if necessary.
- Optional: Simulate Electric Current:
- Attach a small LED or bulb near the solar panel to demonstrate the flow of electric current when sunlight is absorbed.
6. Assembly and Presentation
- Secure Components:
- Glue or tape all components (solar panel, fence, house, road) securely to the base.
- Ensure the model is stable and can be displayed without falling apart.
- Enhance Visual Appeal:
- Use additional decorations like trees, crops, or animals (made from cardboard or paper) to enhance the realism of the agriculture fields.
Testing and Demonstration
- Solar Power Demonstration:
- Place the model in direct sunlight or under a bright light source to demonstrate solar energy absorption.
- Show how the solar panel generates electricity to power the electric fence.
- Electric Fence Operation:
- Discuss how the electric fence works to deter animals or pests from entering the agriculture fields.
- Explain the benefits of using solar-powered electric fences in agriculture.
By following these steps, you’ll create an informative and visually engaging solar fencing model for agriculture using cardboard, color paper, and thread. This project effectively demonstrates the integration of solar energy technology with agricultural practices, highlighting its practical applications in protecting crops or livestock.