
Creating a simple and easy 3D skin model using a cardboard box for a biology project is a great way to visually represent the different layers and structures of the skin.
Here’s a step-by-step guide to help you build this model:
Materials Needed:
- Cardboard box (a small to medium-sized box will work)
- Cardboard sheets (for additional layers and structures)
- Color paper (various colors)
- Scissors or craft knife
- Glue or tape
- Markers or pens
- Cotton balls (for representing fat layer)
- String or thin yarn (for hair and blood vessels)
- Small beads or buttons (for glands and other structures)
- Ruler
Step by Step Video Instructions:
1. Prepare the Base:
- Take a cardboard box and place it horizontally so that the open side faces up.
- This box will serve as the base of your skin model, where you will build and layer the different parts of the skin.
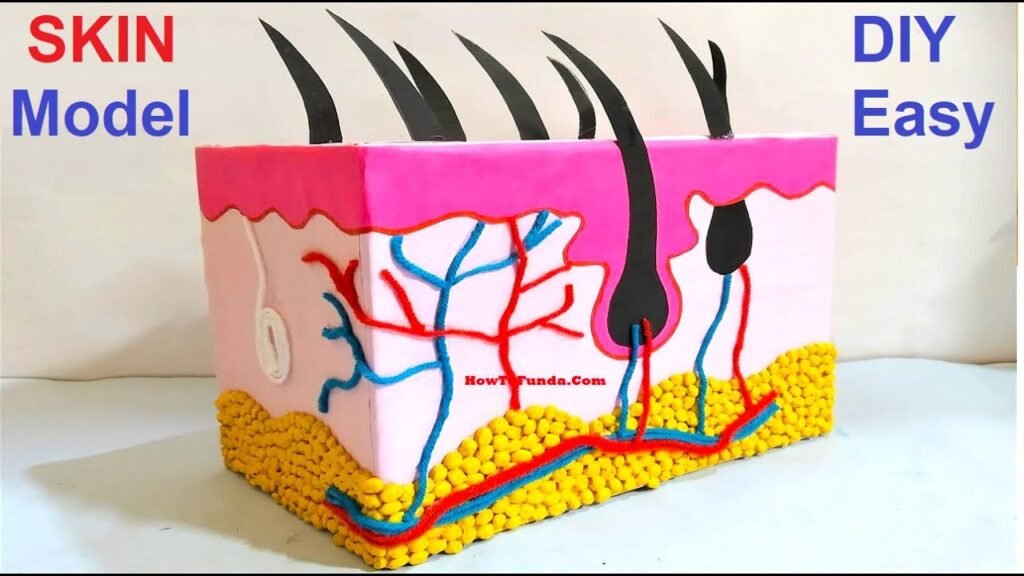
2. Create the Layers of the Skin:
- Epidermis: Cut a piece of cardboard to fit the width of the box. Cover it with a layer of light-colored paper (e.g., light pink or peach) to represent the epidermis. Glue it to the top inside of the box.
- Dermis: Cut another piece of cardboard slightly larger than the epidermis layer. Cover it with a different color paper (e.g., light brown or tan) to represent the dermis. Glue it below the epidermis.
- Hypodermis (Subcutaneous Layer): Cut a third piece of cardboard larger than the dermis layer. Cover it with yellow paper to represent the fat layer. Glue it below the dermis.
3. Add Structures to the Layers:
- Hair Follicle: Cut a small strip of cardboard and cover it with color paper. Glue it vertically, extending from the epidermis down through the dermis and into the hypodermis. Attach a piece of string or thin yarn at the top to represent a hair shaft.
- Sweat Gland: Use a small bead or button and attach it within the dermis layer. Use a piece of string or thin yarn to create a coiled structure leading to the surface (epidermis).
- Sebaceous (Oil) Gland: Similar to the sweat gland, use a small bead or button and place it near the hair follicle within the dermis.
- Blood Vessels: Use red and blue strings or yarn to represent arteries and veins. Arrange them within the dermis and hypodermis layers.
- Nerves: Use a different color string (e.g., yellow) to represent nerve endings in the dermis.
4. Add Fat Cells:
- To represent the fat cells in the hypodermis, use cotton balls. Glue several cotton balls at the bottom layer (hypodermis) to give a fluffy texture.
5. Label the Parts:
- Cut small pieces of color paper to create labels for each part of the skin: Epidermis, Dermis, Hypodermis, Hair Follicle, Sweat Gland, Sebaceous Gland, Blood Vessels, Nerves, Fat Cells.
- Write the names on the labels and attach them to the corresponding parts of the model using glue or tape.
Explanation:
This model represents the three main layers of the skin and various structures within them.
- Epidermis: The outermost layer of the skin, which acts as a protective barrier. It’s thin but crucial for shielding the body from the external environment.
- Dermis: The middle layer, thicker than the epidermis. It contains hair follicles, sweat glands, sebaceous glands, blood vessels, and nerves. This layer is responsible for sensation, temperature regulation, and producing sweat and oil.
- Hypodermis (Subcutaneous Layer): The deepest layer, primarily composed of fat cells. It provides insulation and cushioning for the body.
Here are some key structures:
- Hair Follicle: Extends from the dermis to the epidermis, producing hair that grows out through the skin.
- Sweat Gland: Produces sweat, which travels to the surface to cool the body.
- Sebaceous (Oil) Gland: Produces oil that keeps the skin moisturized.
- Blood Vessels: Supply nutrients and oxygen to the skin and remove waste products.
- Nerves: Allow the skin to sense touch, pain, and temperature.
The model demonstrates how these layers and structures work together to protect the body, regulate temperature, and provide sensory information.