In this post we write about making of the pulley working model – simple machine – physics – diy
#pulleyworkingmodel #simplemachine #diy #physics #diypandit #workingmodel #scienceexhibition #scienceproject #sciencefair

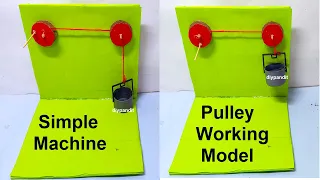
Creating a pulley working model using cardboard pulleys, thread, a plastic bucket, and color paper is a great way to demonstrate the principles of mechanical advantage and simple machines.
Here’s a step-by-step guide to help you build this project:
Materials Needed
- Cardboard
- Color paper (optional, for decoration)
- Thread or string (strong and durable)
- Plastic bucket (small)
- Wooden skewers or pencils (to act as axles for pulleys)
- Scissors
- Glue or tape
- Marker
- Small weights or objects (to lift with the pulley)
Step by Step Making of Simple Machine Working Model
1. Prepare the Base and Pulleys
- Base Setup:
- Cut a piece of cardboard to serve as the base of your model.
- Use markers or color paper to decorate the base, if desired.
- Pulley Wheels:
- Cut out two circular shapes from cardboard to create pulley wheels.
- Make them large enough to fit comfortably within the plastic bucket.
- Axles for Pulleys:
- Insert wooden skewers or pencils through the center of each cardboard circle to create axles for the pulleys.
- Secure the axles in place with glue or tape.
2. Attach Pulleys and Bucket
- Mount Pulleys:
- Attach the pulley wheels (cardboard circles with axles) to opposite sides of the plastic bucket using glue or tape.
- Ensure the pulley wheels can rotate freely on their axles.
- Thread Setup:
- Cut a length of thread long enough to run over both pulleys with some slack.
- Thread the string over one pulley wheel and under the other, creating a simple loop.
- Attach Bucket:
- Secure one end of the thread to the top of the bucket.
- Pass the other end of the thread over the pulley wheels and leave it hanging down to attach weights or objects.
3. Demonstrate the Pulley System
- Operation:
- Place small weights or objects inside the plastic bucket.
- Pull down on the free end of the thread to lift the bucket using the pulley system.
- Explain how the pulleys reduce the amount of force needed to lift the load.
- Educational Value:
- Discuss how pulleys work as simple machines to change the direction of force and provide mechanical advantage.
- Explain the concept of fixed and movable pulleys in relation to your model.
By following these steps, you’ll create an effective and educational pulley working model using cardboard pulleys, thread, a plastic bucket, and color paper.
This project not only demonstrates basic principles of physics and mechanics but also engages learners in hands-on exploration of simple machines and mechanical advantage.