INTRODUCTION
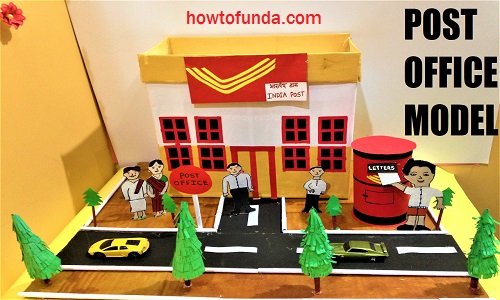
In this topic, we are going to show you how to build a post office model project at home for your science project or exhibitions.
This homemade science experiment is done using materials like cardboard, color and white papers, scissors, paints and hot glue gun which is easily available at home at low cost.
Overview of Post office

It is a public department which provides customer service to the public and handles their mails. It offers acceptance of letters and parcels, sale of postage stamps, packaging, provision of post office boxes and stationery.
How to make the post office model for a school project at home step by step video?
In this video, we will show steps by step video instructions on how to build a post office model at home easy way.
First, take a rectangular shape box and wrap it with white color chart paper and stick it with the help of fevicol.
With the help of scale and pencil draw the post office, color it with dark yellow color.
Take a small piece of rectangular shape red color paper and draw multiple lines to form rectangles, cut them with a scissor.
These will for borders of doors and windows. Take a black color paper and draw rectangles and cut them out to form multiple rectangles for windows.
Stick the rectangular windows to the post office with the help of fevicol and create borders to them with red rectangular papers.
Once it is done, form the rooftop for the post office and stick it with the help of hot glue.
Take a yellow color rectangular paper and draw post office symbol and cut it out. Stick it to the red color rectangular shape red color paper and paste “India post” label to it.
Take an empty plastic bottle and wrap the red color paper around it to form the post office box.
Take black color paper to form the border of the post office box. Use the sketch pen to draw the open box, create two circles using red color paper and stick it to the top and bottom of the cylindrical post office box with the help of fevicol. It will be used to drop letters.
Take a white color rectangular paper and wrap it around a stick to form long cylindrical sticks. Similarly, create multiple cylindrical sticks. Use one such stick and attach the circular post office symbol to it using fevicol.
Take large rectangular shape cardboard and paint it with brown color and paste black color road to it.
Now place already created post office model on top of it and stick the post office label with the help of hot glue.
Create white boarder for the road with already created cylindrical sticks, now place some green color plants and post office box in front of the main post office model.
Place multiple humans in front of the post office.
Materials Used
Materials used in this video are shown below to build the post office model at home by taking the help of your parents.
- Waste Box
- Cardboard
- Scale
- Color paint
- Paintbrush
- Pencil
- Scissor
- Hot glue gun
- Fevicol
Questions & Answers
1. What is the Head Post Office?
It is a controlling authority of All Sub Post Offices in its area.
2. Who is the head of Post Office?
Individual post office head is called a postmaster.
3. What is in the post office?
It is a public department which provides customer service to the public and handles their mail.
Conclusions
Post office model helps students to learn about its purpose, functions as well as how to make it with easily available materials at home.

