
The phases of the Moon refer to the different appearances of the Moon as observed from Earth due to the changing positions of the Sun, Earth, and Moon in their orbits.
The Moon goes through a regular cycle of phases, transitioning from New Moon to Full Moon and back again. Here’s an introduction to the phases of the Moon:
1. New Moon:
- Description: During a New Moon, the side of the Moon facing Earth is not illuminated by the Sun, making it appear completely dark.
- Position: The Moon is positioned between the Earth and the Sun.
2. Waxing Crescent:
- Description: A small, illuminated crescent of the Moon becomes visible on the right side.
- Position: The Moon is still relatively close to the Sun, and its illumination is increasing.
3. First Quarter (First Quarter Moon):
- Description: Half of the side of the Moon facing Earth is illuminated, resembling a half-moon shape.
- Position: The Moon is at a 90-degree angle relative to the Earth and the Sun.
4. Waxing Gibbous:
- Description: More than half but not yet fully illuminated; the illuminated portion is increasing.
- Position: The Moon continues to move away from the Sun.
5. Full Moon:
- Description: The entire side of the Moon facing Earth is fully illuminated, appearing as a complete circle.
- Position: The Moon is positioned opposite the Sun, with Earth in between.
6. Waning Gibbous:
- Description: More than half but not fully illuminated; the illuminated portion is decreasing.
- Position: The Moon is moving away from the Full Moon phase.
7. Last Quarter (Last Quarter Moon):
- Description: Half of the side of the Moon facing Earth is illuminated, but on the left side, opposite to the First Quarter.
- Position: The Moon is again at a 90-degree angle relative to the Earth and the Sun.
8. Waning Crescent:
- Description: A small, illuminated crescent of the Moon becomes visible on the left side.
- Position: The Moon is moving closer to the Sun in preparation for the next New Moon.
Cycle Continues:
- After the Waning Crescent, the Moon returns to the New Moon phase, and the cycle repeats.
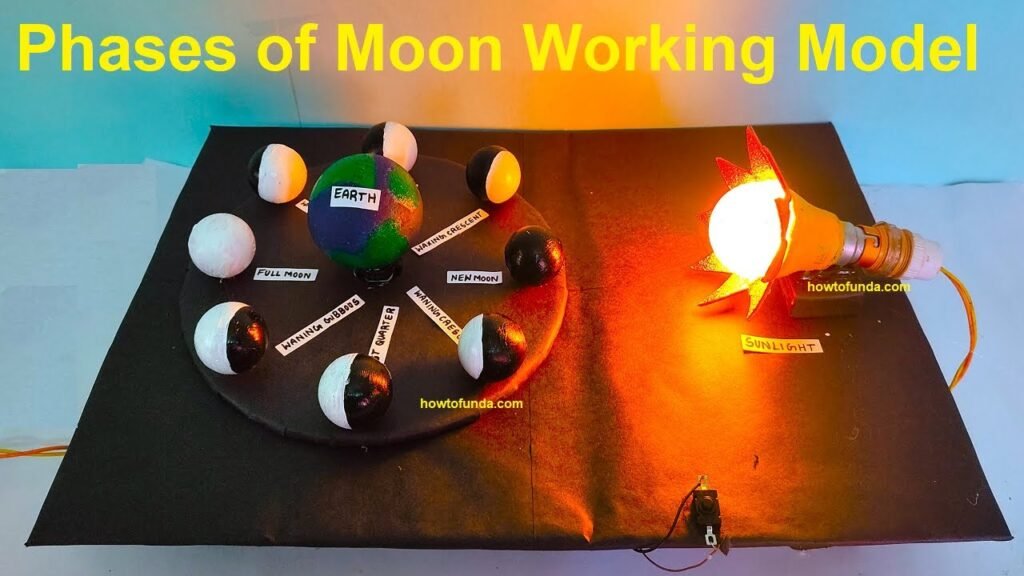
phases of the Moon working model making
Creating a working model to demonstrate the phases of the Moon involves representing the relative positions of the Sun, Earth, and Moon in their orbits.
Here’s a simple and effective way to build a working model:
Materials Needed:
- Small styrofoam or foam ball (representing the Moon)
- Larger styrofoam or foam ball (representing the Earth)
- Wooden dowel or skewer
- Light source (e.g., flashlight or lamp)
- Paint (white, gray, black)
- Craft paper or cardboard
- Glue
- String or thread
- Markers
- Dark room or box (for demonstration)
Steps:
- Prepare the Moon Model:
- Use a small styrofoam or foam ball as your Moon. Paint it with white, gray, and black colors to represent the lunar surface. Add details such as craters.
- Prepare the Earth Model:
- Use a larger styrofoam or foam ball as your Earth. Decorate it with continents using craft paper or markers.
- Attach the Models to the Dowel:
- Attach the Moon model to the wooden dowel or skewer, ensuring it is securely mounted. Place the Earth model on the dowel below the Moon model.
- String for Rotation:
- Attach a string or thread to the top of the Moon model and tie the other end to a fixed point above it. This string represents the axis around which the Moon rotates.
- Demonstration Setup:
- Position the Earth model and the Moon model on the dowel in a dark room or box. Ensure that the Moon is initially between the Earth and the light source (representing the Sun).
- Illuminate with Light Source:
- Shine the light source (Sun) on the Earth and Moon models. The side of the Moon facing the light source will be illuminated.
- Rotate the Moon Model:
- Slowly rotate the Moon model around the Earth, while keeping the same side facing the Earth. This rotation simulates the Moon’s orbit around Earth.
- Observe the Changing Phases:
- As you rotate the Moon, observe how the illuminated portion of the Moon changes, demonstrating the different phases (New Moon, Waxing Crescent, First Quarter, Waxing Gibbous, Full Moon, Waning Gibbous, Last Quarter, Waning Crescent).
- Explain the Phases:
- Explain to your audience that the changing phases of the Moon are a result of the relative positions of the Sun, Earth, and Moon in their orbits. Emphasize that the side of the Moon facing the Sun is illuminated, and the observed phases are due to our changing perspective from Earth.
- Discussion:
- Engage your audience in a discussion about the significance of the Moon’s phases, the lunar cycle, and how these observations have been important historically and culturally.