In this post we wrie about making of paramecium cell model for science project exhibition | DIY at home

Creating a Paramecium cell model using cardboard, color paper, woolen thread, and chopsticks as the base can be a great way to learn about the structure of this microscopic organism.
Paramecium is a single-celled, ciliated protozoan that is commonly studied in biology.
Let’s build a simple 3D model of a Paramecium cell using these materials.
Materials needed:
- Cardboard (for the base and structures)
- Color paper (for the outer covering and details)
- Woolen thread (for cilia)
- Chopsticks (for the base cardboard support)
- Scissors
- Glue
- Markers or pens (for labeling and details)
Step-by-step instructions:
- Base:
- Take the chopsticks and arrange them in a rectangular shape to form the base of the model.
- Use glue to secure the chopsticks together to create a sturdy base.
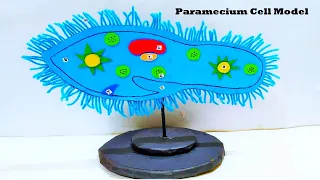
- Paramecium Cell Shape:
- Cut out the main body shape of the Paramecium cell from cardboard. It is an elongated oval shape with a slightly pointed anterior (front) end.
- Attach the Paramecium cell shape to the chopstick base using glue.
- Outer Covering:
- Use color paper to cover the Paramecium cell model. Cut the color paper to match the shape of the cell and glue it around the cardboard structure.
- Oral Groove and Cytostome:
- Cut out a small semi-circular shape from color paper to represent the oral groove of the Paramecium.
- Attach this shape to the anterior end of the Paramecium cell.
- Draw and label the cytostome (cell mouth) at the end of the oral groove.
- Pellicle and Cilia:
- Use woolen thread to represent the cilia that cover the Paramecium’s surface. Cut short pieces of woolen thread and glue them all around the Paramecium cell’s outer covering.
- The cilia should be dense and evenly distributed.
- Nucleus:
- Cut a small circle or oval shape from color paper to represent the nucleus of the Paramecium.
- Attach the nucleus inside the Paramecium cell, closer to the posterior (back) end.
- Other Structures:
- If you want to add other organelles or structures inside the Paramecium cell model, you can cut and attach small shapes or use markers to draw them.
- Use markers or pens to label the various structures of the Paramecium cell, such as the oral groove, cytostome, and nucleus.
- Now, you have a simple 3D Paramecium cell model made from cardboard, color paper, woolen thread, and chopsticks. This model can be a helpful visual aid to understand the basic structure of a Paramecium and its ciliated surface, which helps it move and feed.
#parameciumcellmodel #scienceproject #craftpiller