In this article we write about making of the maths tlm on interior angles – maths working model – maths tlm – diy – simple and easy
#interiorangles #mathstlm #maths #tlm #workingmodel #diy #simple #mathsworkingmodel

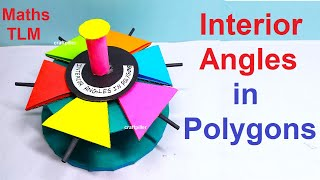
Creating a working model to demonstrate the six types of interior angles using a rotatable design is a fantastic way to visualize and understand these mathematical concepts.
Here’s a step-by-step guide to making this model using cardboard, color paper, and a cardboard pipe for the rotatable mechanism.
Materials Needed:
- Cardboard (for the base, rotating disks, and pipe)
- Color paper (for covering and labeling)
- Scissors or craft knife
- Glue or hot glue gun
- Markers or pens
- Brass fasteners or paper fasteners (for attaching the rotating disks)
- Ruler
- Compass (for drawing circles)
Video guide on step by step making of interior angles – maths working model – maths tlm
1. Prepare the Base and Rotating Disks
- Base Preparation:
- Cut a large rectangular piece of cardboard for the base. Cover it with color paper for a neat finish.
- Rotating Disks:
- Use a compass to draw six triangle on cardboard. These will be the rotating disks, each representing a different type of interior angle.
- Cut out the circles and cover them with color paper.
- Cardboard Pipe:
- Create a cardboard pipe by rolling a piece of cardboard into a cylindrical shape and securing it with glue. This will serve as the central axis for the rotating disks.
2. Label and Attach Disks
- Label Disks:
- Label each disk with the name of an interior angle type and include the definition and an example of the angle.
- Interior Angle (general)
- Alternate Interior Angles
- Same-Side Interior Angles (Consecutive Interior Angles)
- Angles of a Polygon (Sum of interior angles)
- Interior Opposite Angles
- Interior Adjacent Angles
- Attach Disks to the Pipe:
- Make a hole in the center of each disk using a compass or craft knife.
- Insert the cardboard pipe through these holes. Ensure the disks can rotate around the pipe.
- Secure the disks in place with brass fasteners or glue if necessary, allowing for rotation.
3. Create Definitions and Examples
- Definitions and Examples:
- On each disk, write the definition of the interior angle type and draw an example showing the angles.
- Use color paper to make the examples visually appealing and easy to understand.
4. Assemble the Model
- Attach Pipe to the Base:
- Make a hole in the center of the base for the cardboard pipe.
- Insert the pipe through the hole and secure it with glue, ensuring it stands upright and allows the disks to rotate freely.
- Position the Disks:
- Ensure the disks are evenly spaced along the pipe and can rotate without obstruction.
5. Demonstrate the Interior Angles
- Interior Angle (General):
- On one disk, define an interior angle and draw an example within a polygon.
- Include the definition: “An interior angle is an angle formed between two sides of a polygon that is inside the polygon.”
- Alternate Interior Angles:
- On another disk, define alternate interior angles and draw an example with two parallel lines and a transversal.
- Include the definition: “Alternate interior angles are angles that are on opposite sides of the transversal and inside the parallel lines.”
- Same-Side Interior Angles (Consecutive Interior Angles):
- On another disk, define same-side interior angles and draw an example.
- Include the definition: “Same-side interior angles are two angles that are on the same side of the transversal and inside the parallel lines.”
- Angles of a Polygon (Sum of Interior Angles):
- On another disk, show how to calculate the sum of interior angles of a polygon.
- Include the definition: “The sum of the interior angles of a polygon is (n-2) × 180°, where n is the number of sides.”
- Interior Opposite Angles:
- On another disk, define interior opposite angles and provide an example.
- Include the definition: “Interior opposite angles are the angles formed inside a polygon by extending one of its sides.”
- Interior Adjacent Angles:
- On another disk, define interior adjacent angles and provide an example.
- Include the definition: “Interior adjacent angles are two angles that share a common side and vertex inside a polygon.”
6. Final Touches
- Ensure Functionality:
- Check that all disks can easily rotate around the cardboard pipe to reveal the different angle types.
- Add Visual Aids:
- Use different colors for different angle types to make them stand out.
- Add small arrows or lines to clearly illustrate the angles.
Example Layout:
- Top Disk: Interior Angle (General) with definition and example inside a polygon.
- Second Disk: Alternate Interior Angles with definition and example using parallel lines and a transversal.
- Third Disk: Same-Side Interior Angles with definition and example.
- Fourth Disk: Angles of a Polygon with formula and example.
- Fifth Disk: Interior Opposite Angles with definition and example.
- Bottom Disk: Interior Adjacent Angles with definition and example.
By following these steps, you can create an interactive and educational rotatable model to demonstrate different types of interior angles.