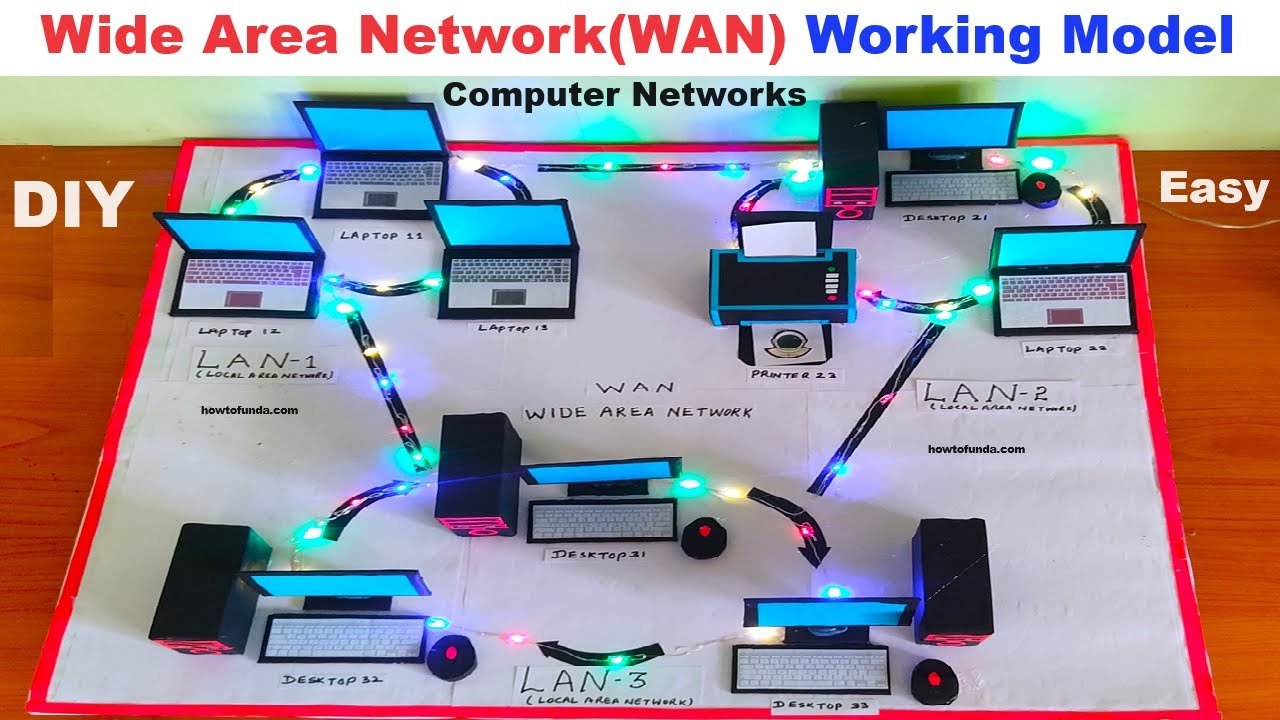
Creating a wide area network (WAN) model using cardboard, color paper, and serial lights can be an engaging project to understand how networks connect over long distances.

Here’s a step-by-step guide to help you build a basic WAN model:
Materials Needed:
- Cardboard (for the base and structures)
- Color paper (for detailing and decoration)
- LED lights (to represent network connections)
- Wires or string (to connect LEDs)
- Small switches or hubs (optional, for realism)
- Markers, scissors, glue, ruler, and other crafting tools
Steps to Build the WAN Model:
- Prepare the Base:
- Use a large piece of cardboard as the base for your WAN model. This will serve as the foundation where you’ll build your network layout.
- Create Geographical Features:
- Use smaller pieces of cardboard to create representations of cities, countries, or continents connected by WAN links. These can be simple shapes like rectangles or circles.
- Decorate with Color Paper:
- Cover the cardboard shapes with color paper to add visual appeal and differentiate between different geographical locations in your WAN model.
- Install LED Lights:
- Determine where each network connection point (represented by LEDs) will be placed within the WAN model. Poke small holes in the cardboard to insert the LED lights.
- Connect each LED with wires or string to simulate WAN connections. Use different colors of wires to represent different types of connections (e.g., fiber optic cables, satellite links).
- Set Up the Network Layout:
- Arrange the cardboard shapes on the base to represent the geographical layout of your WAN. Place LED lights at strategic points to represent connected network nodes or cities.
- Use markers to label each location (e.g., City A, City B, International Office).
- Optional: Add Switches or Hubs:
- If you want to add more realism to your model, place small switches or hubs at key connection points in your WAN layout. Connect LEDs to these switches to show network connectivity.
- Detailing and Labeling:
- Use markers to add details such as borders between countries or regions, landmarks, and other geographical features to your WAN model.
- Label the LED lights with numbers or labels corresponding to specific network nodes or connection points within the WAN.
- Test and Adjust:
- Once everything is assembled, test the LED lights to ensure they light up correctly when powered.
- Make any necessary adjustments to wiring or positioning to improve the functionality and appearance of your WAN model.
- Presentation:
- When presenting your WAN model, explain how WANs connect distant locations, the technologies involved (e.g., fiber optics, satellite communication), and the benefits of wide area networking.
- Demonstrate how data flows through the WAN by toggling LEDs or describing hypothetical scenarios of data transfer between locations.